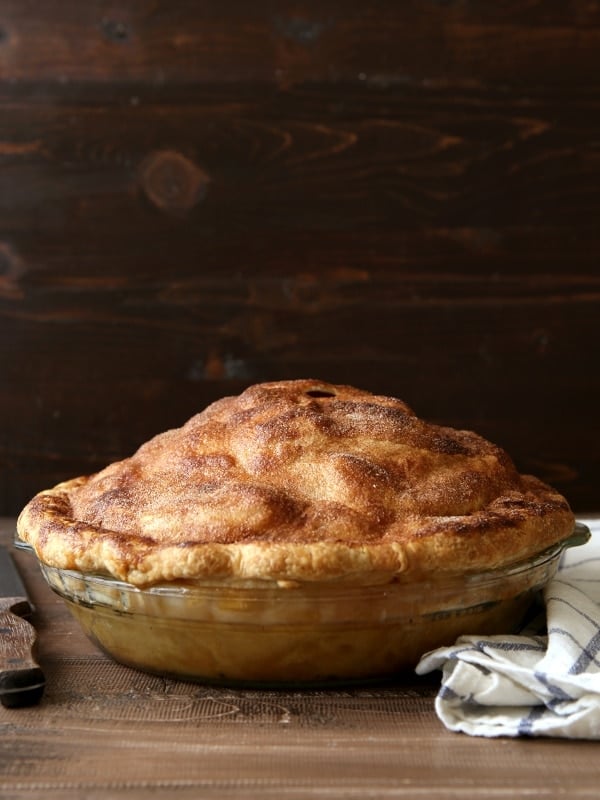
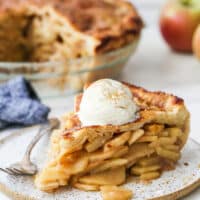
Deep Dish Mile High Apple Pie
If you’re looking for the BEST apple pie, then this stunning deep-dish mile high apple pie is for you!
This is the apple pie to end all apple pies, and the only apple pie recipe you’ll never need. It’s simple and classic— just a pile of apples spiced with cinnamon, baked in homemade butter pie crust pastry.
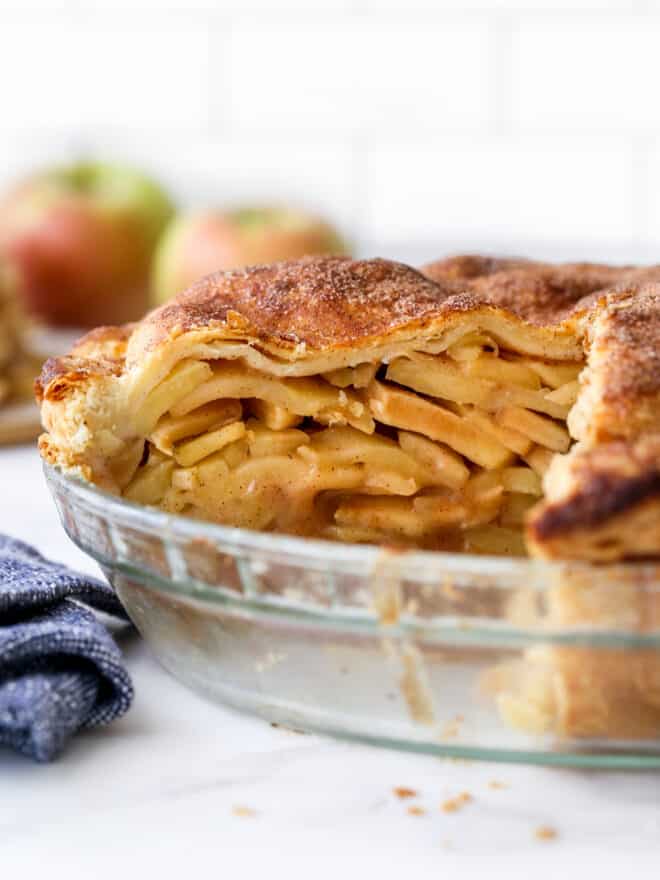
However, there is one obvious thing that sets this “mile-high” apple pie apart from all the others. With nearly six pounds of apples inside, it’s sure to be the largest apple pie you’ll ever bake! It’s huge.
This means more apples, a taller pie, and bigger smiles when you make that first slice.
Why you’ll love this deep dish apple pie recipe
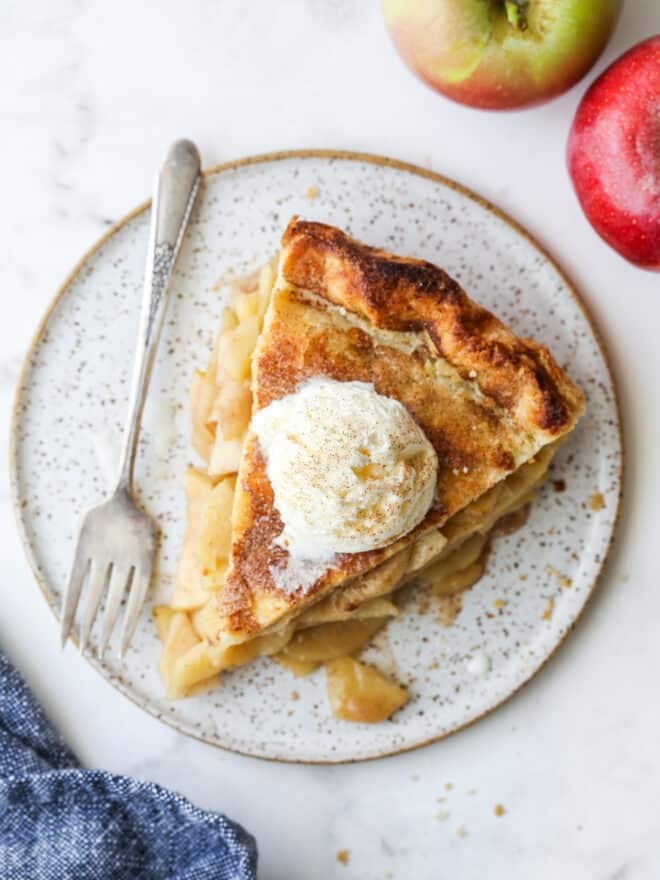
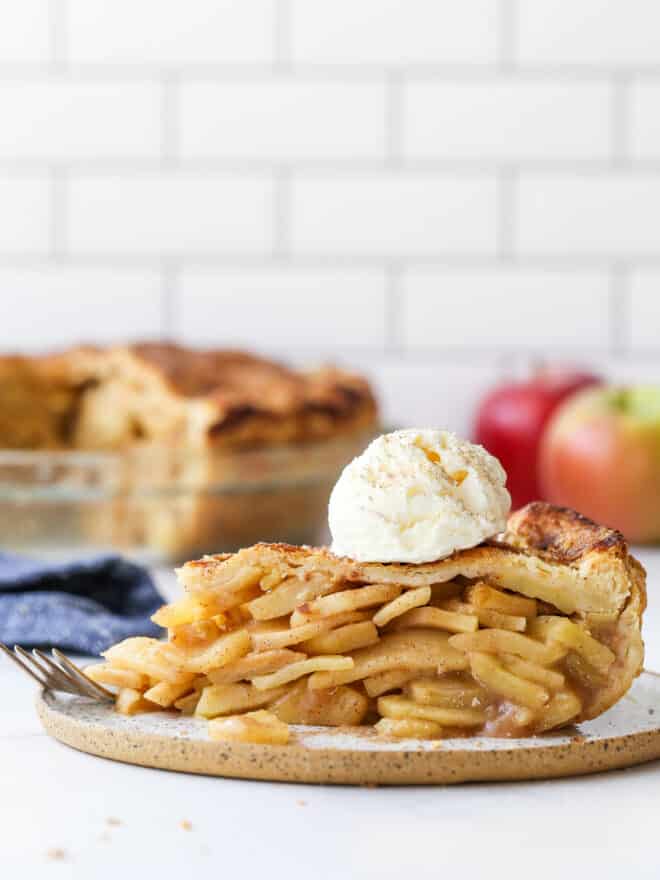
The combination of sweet and tender cinnamon apples with flaky pie dough is a cozy combo perfect for the fall and holiday season. Serving it with vanilla ice cream is optional, though always highly recommended.
This large deep dish pie is meant to feed a crowd, as you can easily get 12-16 tall slices out of it. It’s just begging to be on your seasonal menu!
Ingredients you’ll need
Let’s get baking, shall we? Here’s everything require to make this mile high apple pie (full recipe at the end of article):
The best apples for apple pie
The best apples to bake with are ones that are tart, firm, and won’t break down in the oven. Granny smith, jonagold, jonathan, gala, honeycrisp, and pink lady/cripps pink are all great varieties to choose from. Stick to one type of apple, or feel free to combine several varieties to get even bigger flavor.
This recipe is made with almost 6 lbs of apples. That’s so many apples! That ends up being about about 16 medium apples total.
How to make this mile high apple pie
- Prepare crust. See my tutorial for foolproof flaky pie crust or use my shortcut method for making pie crust in a food processor. You can also use your own favorite pie crust recipe! As always, homemade pie crust is best. Give pie crust at least 2 hours to rest in the fridge before using.
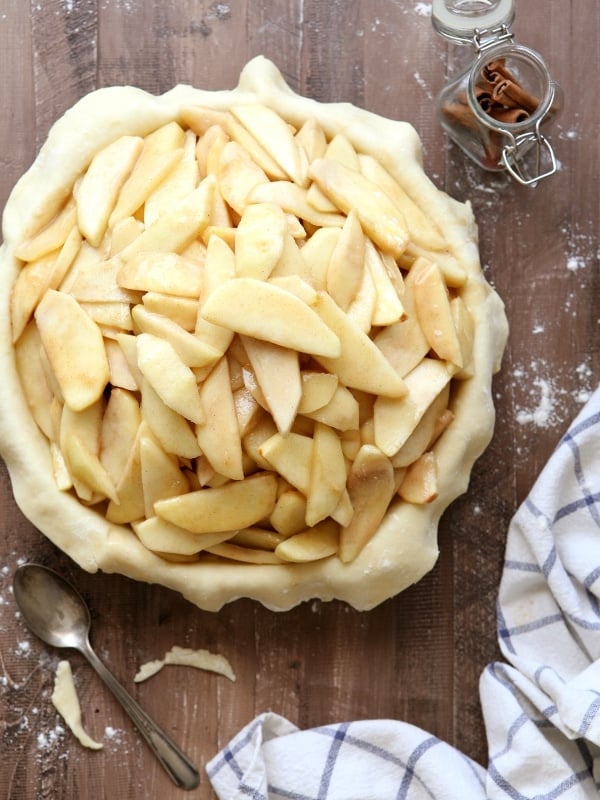
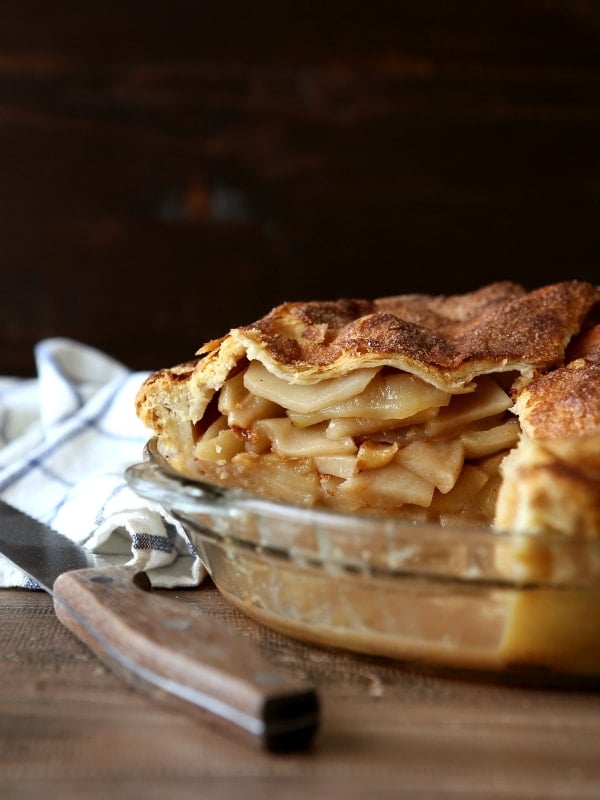
- Cook apple filling on the stove. Combine sliced apples, sugar, cinnamon and lemon juice in a large pot or skillet over medium heat. Simmer mixture until apples are tender but hold their shape and juices have thickened, then set pot aside to cool slightly. Cooking the apples on the stove before adding the to the pie reduces them a bit so they will all fit, and also to prevent a gap from forming in the oven between the crust and filling.
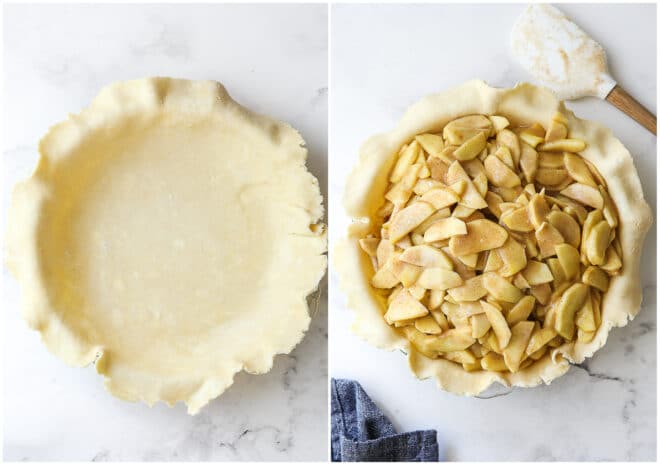
- Add apple filling to pie crust. Roll out both pie crusts to about 13 inches and transfer one to a 9-inch pie plate (deep dish pie pan not necessary). Scoop filling into the pie crust and top with second pie crust.
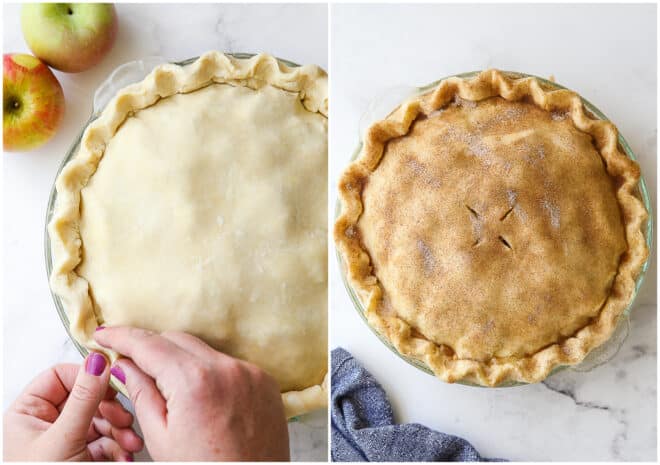
- Crimp edges and add cinnamon-sugar. Pinch edges of both crusts together to seal, and crimp decoratively as desired. Brush the top crust all over with egg wash and sprinkle with cinnamon-sugar. With a sharp knife, cut a few vents in the top for steam to escape.
- Bake pie. Place pie on a sheet pan to catch any juices and bake pie at 400°F for about 1 hour until crust is golden brown and juices are bubbling out. It’s likely your crust will be done before filling is bubbly, so cover the pie with foil to prevent the crust from burning.
- Let it cool. This is such a hard, but crucial step. The pie is not completely set until it cools. If possible, let it cool for at least 1 hour before slicing and serving.

Tips for making the best deep dish apple pie
- For this recipe you’ll need about 16 (yes, 16!) medium apples to get to 5.5lbs.
- This is how I peel and core apples for baking. It’s fast and easy!
- You can use store-bought pie crust, but homemade is preferred! Feel free to use the recipe below (psst, it’s my favorite buttermilk pie crust) or substitute for your own homemade crust.
- You do not need a “deep-dish” pie pan to make this pie. A standard 9-inch pie dish will work just fine. I prefer to use pyrex or ceramic pie dishes.
- Don’t skip the egg wash! Without it your pie will be dull and colorless.
- If the pie crust edges brown more quickly than the center, cover with a sheet of foil with an 8-inch circle cut out of the inside, or pie crust shield. When the pie crust is perfectly golden brown, cover the whole thing with foil to prevent it from burning while the filling finishes cooking.
- To allow the apple pie filling to completely set up, let it rest at room temperature at least for 1 hour before slicing.
- This pie is delicious both served warm or at room temperature. To reheat a cool pie, cover with foil and warm in a 350°F oven for about 30 minutes.
- You can store this pie at room temperature for about 24 hours. Anything longer than that and I would recommend storing in the fridge to keep it fresh.
- Don’t forget the vanilla ice cream!
More pie resources
- Place your pie on a baking sheet pan to easily transfer it back and forth from the oven, and to catch any juices that bubble out.
- For cleanest slices (as shown in these photos), let the pie cool completely to room temperature, which will take several hours. You can also let it chill in the fridge.
- Looking to save some time? Learn how to make pie crust in the food processor.
- If you’re interested in adding a lattice top to your pie, see my photo tutorial on how to make a lattice pie crust.
- If pies intimidate you or they just don’t seem to come out right, be sure to check out my best tips for making perfect pies. I share solutions for the most common pie baking problems like how to prevent a runny filling, cracked crust, soggy bottoms and more!
- Here’s a list of my favorite pie tools.
More apple pie recipes
Shop tools for this recipe
This recipe was originally published in October 2012.
Mile High Apple Pie
Ingredients
Pie crust:
- 2 ½ cups (300 grams) all-purpose flour
- 1 tablespoon sugar
- 1 teaspoon salt
- 1 cup (226 grams) unsalted butter , cold and cut into cubes
- ½ cup (118 ml) cold buttermilk
Apple filling and assembly:
- 5 ½ lbs (2.6 kg) apples , peeled and sliced into ¼-inch pieces (see Notes)
- 3 tablespoon lemon juice , fresh or bottled
- 1 cup (200 grams) granulated sugar
- ¼ cup (50 grams) + 2 tablespoons all-purpose flour
- 3 teaspoons ground cinnamon , divided
- 1 large egg + 1 teaspoon water , for egg wash
- 2 tablespoons granulated sugar , for sprinkling
Instructions
To make the pie crust:
- Combine the flour, sugar, and salt in a bowl. Add the cubed butter and toss to coat.
- Dump the mixture out onto a clean surface and use a rolling pin to roll the butter into thin sheets, combining it with the flour. Use a bench scraper to scrape the rolling pin and bring the mixture back into a pile as necessary.
- Continue until all of the butter is incorporated into the flour. Mixture will be very flaky.
- Return mixture to the bowl and place in the freezer for 10 minutes to chill the butter.
- Remove from freezer and add the cold buttermilk. Use a spoon and then your hands to stir the mixture until it comes together into a ball. If mixture is too dry, add additional buttermilk a teaspoon at a time.
- Divide the dough in half and flatten into disks. Wrap each disk in plastic wrap and chill in the fridge for at least 1 hour and up to 5 days.
To prepare the pie filling:
- In a large skillet add the apple slices, lemon juice, 1 cup of the sugar, the flour and 2 teaspoons of the cinnamon. Set over medium high heat.
- Stir frequently as the sugar dissolves and the apples soften. Simmer until apples are soft but still hold their shape and the juices have thickened, about 15 minutes. The whole mixture should appear to be reduced by a third. Set aside to cool while you prepare the crust.
To assemble the pie:
- Preheat oven to 400 degrees F.
- Let the dough rest at room temperature for five minutes. On a lightly floured surface, use a rolling pin to roll out the dough into a rough 13-inch circle. Dough should be about ¼ inch thick. Transfer dough to 9-inch pie dish. Roll out the second disk of dough.
- Dump the cooled apple pie filling into the bottom crust. Transfer the second crust to the top of the pie. Trim edges to about 1 inch.
- Fold the edges of the top and bottom crusts together and use your index fingers and thumb to pinch into a pattern. Brush with egg wash. Combine remaining sugar and cinnamon and sprinkle over the top of the pie. Cut a few slits in the crust as vents for steam.
- Place pie on a sheet pan to catch any filling that bubbles over. Bake pie until golden on top and filling bubbles through vents, about 1 hour. If crust browns too quickly, cover loosely with foil.
- Let the baked pie come to room temperature on a wire rack for several hours before serving, to allow the filling to finish thickening.
- Serve with whipped cream or vanilla ice cream, if desired.
Video
Notes
NOTES
- For more pie crust tips and step-by-step photos, check out my foolproof flaky pie crust tutorial.
- You will need about 16 medium-sized apples to make this recipe.
- This recipe was originally published in September 2012. Photos have been updated, and recipe method has been improved.

I’ve never made apple pie either! Then again, I prefer fresh fruits over baked fruits.
I know, I’m weird..
I totally understand! I always have good intentions of baking with the fruit that I buy but more often than not I can’t help myself and eat it all up before I get the chance.
This looks yummy. Can I ask if you take your photo’s outside? It looks like some are taken on a deck or patio. Looks great.
I actually took them inside, with a scrap of someone’s old fence I snagged for just this purpose. 🙂
Beautiful! Love the look of this!
This pie looks absolutely amazing! And your foliage photos are just lovely!
Now that I think about it, I don’t think I’ve ever made just an apple pie before, either! I have a sour cream apple pie that is my all-time favorite, but I’m thinking I need to try this because it looks amazing!
This looks so good i can practically taste it! There’s nothing more comforting than a big slice of apple pie and homemade vanilla ice cream. I’ve been bugging my friends about a day trip to an apple orchard to pick some apples and enjoy the beautiful fall weather. I think I just found my weapon of bribery…who can turn down this pie!
I have never seen such a tall pie. You have a special gift of pie making 🙂
Apple pies are my favorite~ you definitely got me at mile high!
Super tempting irresistible pie.
WOW. Are you kidding me? That is completely gorgeous! Oh friend, I cannot tell you how much I’ve been craving apple pie. I wish we could all eat pie together
Let’s do it! Let’s have an “eat pie” day!
First, YUM. Second, where is that hike?! It looks amazing!
Hi Becky! It’s Silver Lake up Big Cottonwood Canyon, right at the base of Brighton. Very family friendly!
Looks delicious!!! 🙂
That gap you mentioned between the apples and crust . . ? Its where you put the slice of cheddar cheese!
Brilliant!! 🙂
How long do you usually bake this pie for?
I usually bake it for about 1 hour, as stated in the recipe.
Made for Thanksgiving. Might be good. I’ll never know. Checked at 30 minutes and pie was burnt to a crisp. I was deeply suspicious that 400 was way too hot an oven and it is.
Hi Paul, so sorry to hear this pie didn’t turn out for you!! I bake all my double crusted pies at 400 degrees and you’ll find that many other pie recipes elsewhere are too. I always keep my eye on the pie crust, and if it looks like it’s browned sufficiently but not done yet, I’ll cover it with foil. I’ll add this note to the recipe to hopefully help others in the future. Also, have you checked to see that your oven is heating correctly? Oven thermometers are cheap and could tell you if your oven runs hot. Hope this helps! 🙂
I have checked my oven. It does what it says it does.
All the recipes I have either bake at 350- 375 or start at 400 and reduce after 15 minutes or so. It got unexpectedly black unexpectedly quickly, though I did like the filling.
Thanks for recipe
I made this pie but there was a giant gap between the filling and the crust. I made it again and instead of pre-cooking the apples on the stove I did it in the oven and drained off all the liquid but still there was a gap. I also did a crust on top and another with a lattice top but they both still had gaps. I tried baking at 400 F and lower temp but still there was a gap! Any thoughts?
Hi Janice! I’m sorry to hear you had trouble with this recipe. I used to always have a huge gap in this recipe until I cooked down the apples. Cooking them down on the stove means the shrinking and reducing happens before the pie is assembled. I do sometimes have a little bit of a gap, but it’s at most about 1 inch, whereas it used to be four inches or more. Maybe try cooking down the apples a little more, and really make sure they’re packed into the crust well so there aren’t gaps and room for them to resettle. I hope this helps!
OMG this is the BEST apple pie I’ve ever made! The crust was perfect and for once there was NO GAP! My husband just said this was the best piece of pie he’s ever had. THANK YOU!
Woohoo! So happy you loved the pie! 🙂
I have made this pie quite a few times now, it has become an annual request at Thanksgiving. Not only is it so delicious, but I love that it’s not too sweet, it’s easy to follow, and the added tip of precooking the apples was a game changer! It was incredible before, but this made it flawless. Not only did it take that gap away, but I think it also makes the apples settle in better, so that when you slice the pie the pieces of apples are laying down so beautifully together. I also finally tackled my fear of making my own crust – successfully! I love all your little helpful tips…for example, I never would have thought to combine different apples but I think it makes it, and I love that you have videos of the crust making process. Thanks again!
Hi Chelsea! So happy you loved this pie! And I’m so glad to hear that all of my tips were helpful. Thanks for the comment!
I have the same recipe for Mile High Apple Pie. It is my favorite. I got my recipe from Los Rios apple farm in Oak Glen, California. I sure miss that place..They also had the best apple cobbler,it had a oatmeal and cinnamon crust. Thank you for passing on this recipe to folks not inCalifornia. I hope they love it as I do.
Yay! Isn’t it the best apple pie?? I got this from a Martha Stewart cookbook (I used to have credit listed there in the recipe, I’ll have to go add it back in) and it’s been a fave of mine for years. So good!
I always bake my pies at 400 but for some reason i baked it at 350. Looks nice. but it took 1hour n 20 minutes. Will insides be overcooked.
No, the pie should still be perfectly fine! It just will take longer to bake (as you experienced) and the crust may not be as golden brown.
Doesn’t so much lemon juice make it sour? I tried a recipe with zest of one lemon and it was too tart. Thanks, I can’t wait to make this.
Nope, I’ve never had a problem with it being to tart or sour.
I have made this pie several times and I believe I have finally created the right combination of apples (Golden Delish, Granny Smith, Figi, Gala, and Honey Crisp) and it is amazing. After the first two pies I determined that the top crust must be larger than 9″ I have been using a recipe with cream cheese and heavy whipping cream and just adjusting the amounts of the ingredients and that works wonderfully. I once had been told no one could make an apple pie like Grandma (challenge time) and they actually love this pie even more than hers!
Delicious pie and I want to tell you about the apples I am lucky enough to have access to…Northern Spies and Winesaps. Both of these are late season apples with incredible flavor. I often add a Jonagold or honey crisp to add additional depth of flavor.
I have made pie dough like in your instructions with a smoky kitchen when baking. All of the butter drained out of the pie crust and what was left was a hardened crust. I chilled dough overnight then again the next day after making the pie for one hour. Can you help me problem solve?
I baked this pie, however the filling didn’t quite reach the edge of the shell. I remade it, except this time I baked the apples first to remove excess moisture, rather than sautéing them.