How to Make a Lattice Pie Crust
Creating a lattice crust for a pie may seem tricky, but here’s detailed instructions for doing it just right. Come learn how to make an easy lattice pie crust with this step-by-step tutorial!
A homemade pie with a lattice crust is one of the most beautiful things you can bake, and it’s a guaranteed crowd pleaser. Thankfully it’s also really easy to do!
If you’ve always wanted to bake your own lattice-topped pie but have been too intimidated to try, I’m here to help! I’ll show you step-by-step just how simple it is.
What is a lattice pie crust?
A pie with a lattice crust means that strips of pie crust have been weaved together on top before baking. It makes a beautiful woven crisscross pattern that’s a lot easier to create than you may think!
What you’ll need
You can top any double-crust pie (pie crust on the bottom and the top) with a woven lattice. Here’s what you’ll need to get started:
- Pie crust (Homemade is strongly preferred, but you can do this with store-bought pie crust too. Here is my favorite flaky butter pie crust recipe)
- Flour, for dusting
- Rolling pin
- Ruler (optional)
- Pizza cutter, pastry wheel, or a sharp knife
- Large egg, for egg wash
- Pastry brush
How to make a lattice pie crust
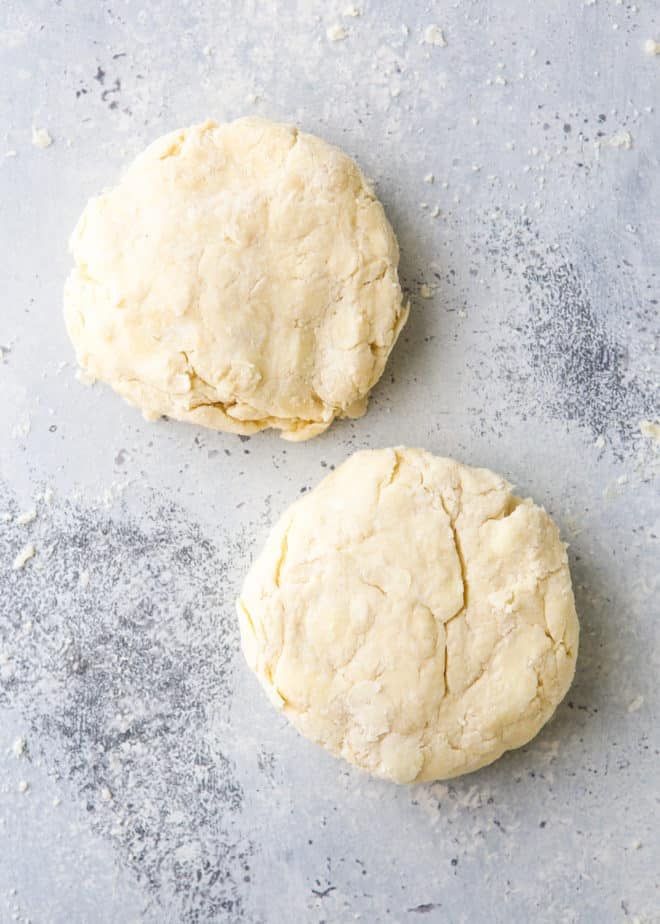
1. Start with chilled pie crust dough. Pie crust should rest in the fridge for at least 2 hours to firm up and relax the gluten in the flour before rolling it out.
2. Prepare the rest of the pie. Roll out the bottom pie crust on a floured surface and transfer to pie baking dish, then prepare filling according to your recipe’s instructions. The lattice topper is the last step!
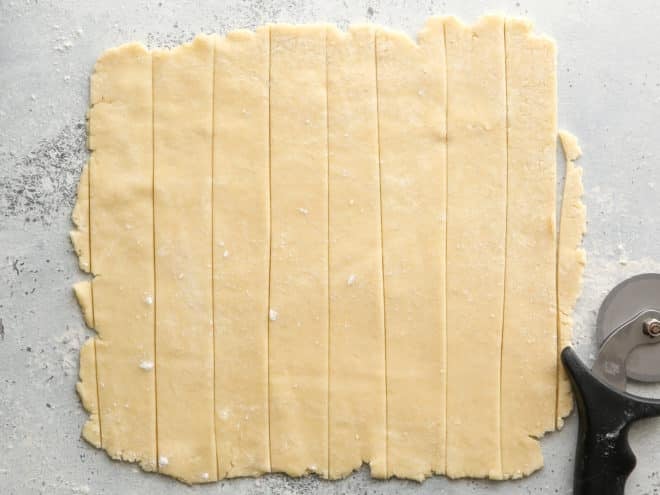
3. Roll out pie crust for lattice. Use a rolling pin to roll out the second pie crust to about ¼-inch thick, dusting your work surface with flour as needed to prevent sticking. You can roll the pie crust out into a circle about 12 inches in diameter, or you can roll it into a rough rectangle as pictured above (my preferred method).
4. Cut into lattice strips. I recommend 8-10 total strips about 1-2 inches wide, but it’s ultimately up to the look you want; thicker strips will hold their shape better during baking. In these photos I used 8 total 1.5 inch strips.
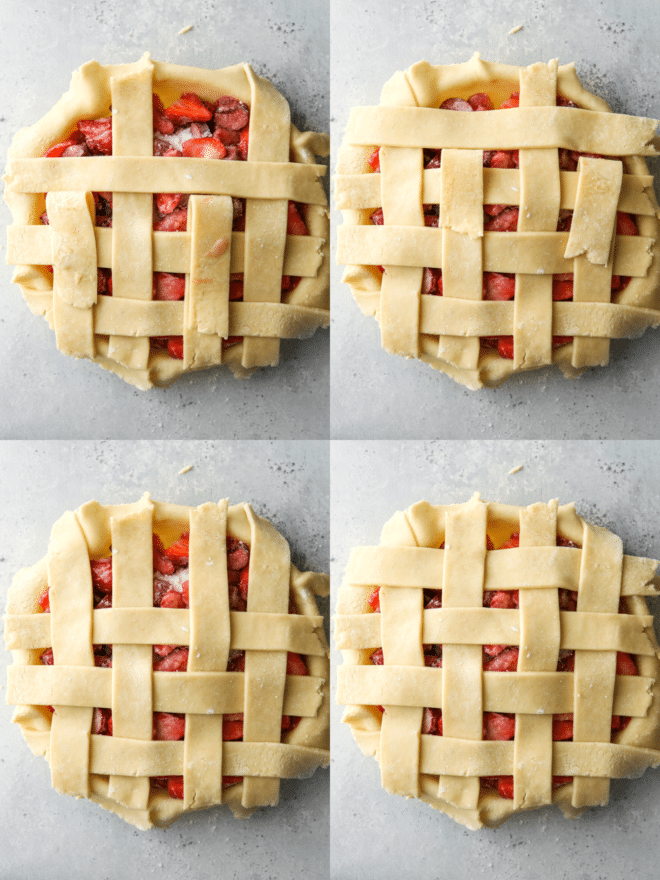
5. Lay vertical set of strips on top of pie. Space half of the pie crust strips evenly on top of your pie, placing longer strips in the center.
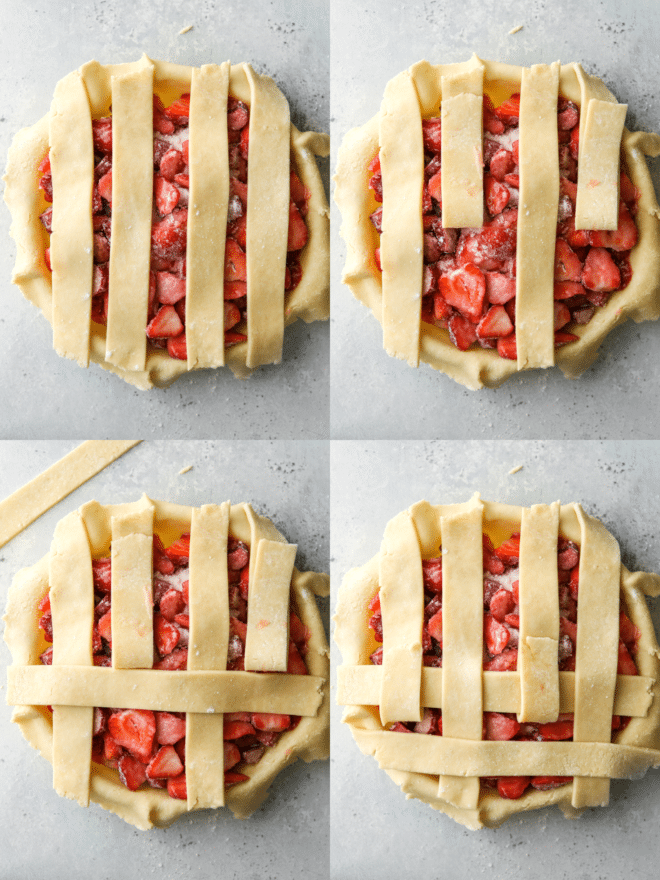
6. Fold every other vertical strip back halfway, add one horizontal strip. Unfold strips so they lay flat again on top of the new strip of dough.
7. Fold the opposite every other vertical strip back, add a second horizontal strip. Make sure horizontal strips are spaced evenly. Lay vertical strips back on top of new strip.
8. Working with the other side now, repeat the weave. Fold every other vertical strip back to the center and lay another horizontal. Lay them back down, fold the opposite every other vertical strip back, and place the final horizontal strip. Lay all strips flat. (If you have more than 8 strips in your weave, you’ll have more strips to work with but the process will be the same.)
And that’s it, you’re done with your lattice weave!
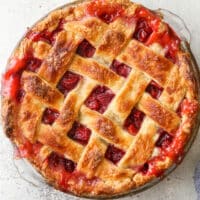
9. Trim pie dough and fold over. Trip any overhanging pie crust to about 1 inch (a little longer is okay). Fold bottom pie crust and top lattice strips together, tucking them underneath into the pie dish, or folding them up towards the center of the pie.
10. Crimp edges of the pie as desired. To make classic crimped edges, use one thumb to press the dough into the index finger and thumb of your other hand, making a triangular edge and sealing the bottom and top crusts together. Repeat around the circumference of the pie.
11. Brush with egg wash. Combine 1 egg with 1 tablespoon of water and brush onto the pie dough. Do not skip this step! It gives pie crusts a lovely golden shine, and your pie will be dull without it. (For extra crunch and sparkle, add a sprinkle of coarse sugar on top of the egg wash.)
12. Bake. Bake your lattice top pie according to the recipe instructions, generally until the crust is golden brown and fruit filling is bubbling in the center.

Add a lattice topping to these pie recipes
All of these pies would be gorgeous with a lattice pie crust!
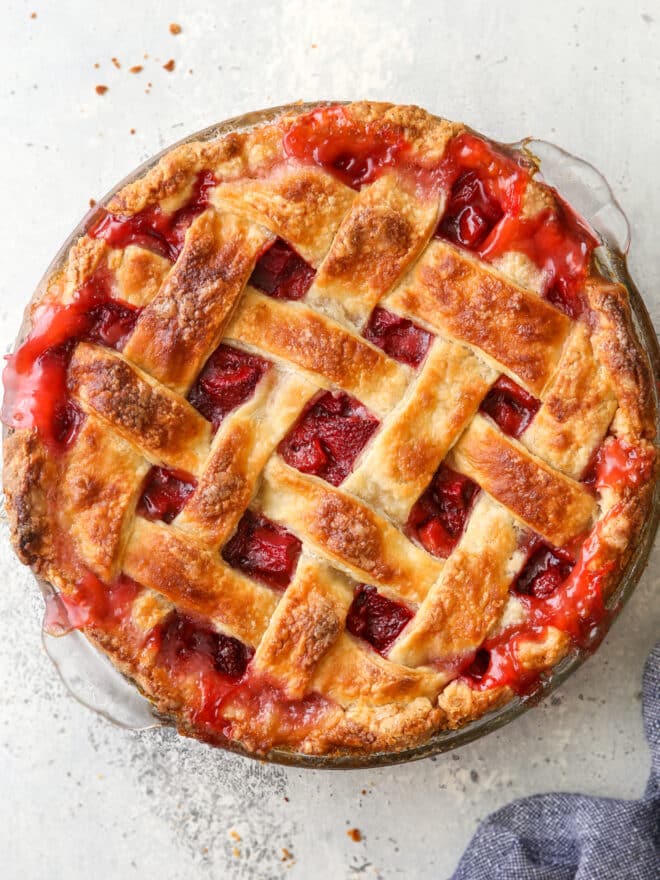
- Strawberry Rhubarb Pie (pictured in this tutorial)
- Black and Blueberry Pie
- Sweet Cherry Pie
- Cranberry Blueberry Pie
Shop tools for this tutorial
This tutorial was originally published June 2015. Photos and instructions have been updated and improved.
How to Make a Lattice Pie Crust
Ingredients
- 1 pie dough
- Flour , for dusting
- 1 large egg + 1 tablespoon water , for egg wash
Equipment


Instructions
- Prepare pie dough. It should rest in the fridge at least 2 hours before using.
- Roll out the bottom pie crust on a floured surface and transfer to pie baking dish, then prepare filling according to your recipe’s instructions.
- Use a rolling pin to roll out the second pie crust to about ¼-inch thick, dusting your work surface with flour as needed to prevent sticking. Roll the pie dough out into a circle about 12 inches in diameter, or you can roll it into a rough rectangle (my preferred method).
- Use a pizza cutter to cut pie dough into strips. I recommend 8-10 total strips about 1-2 inches wide, but it’s ultimately up to the look you want; thicker strips will hold their shape better during baking.
- Lay a vertical set of strips on top of pie, spaced evenly, placing longer strips in the center. Fold every other vertical strip back halfway, and add one horizontal strip. Unfold strips so they lay flat again on top of the new strip of dough.
- Fold the opposite every other vertical strip back, add a second horizontal strip. Make sure horizontal strips are spaced evenly. Lay vertical strips back on top of new strip.
- Now repeat on the other side. Fold every other vertical strip back to the center and lay another horizontal. Lay them back down, fold the opposite every other vertical strip back, and place the final horizontal strip. Lay all strips flat. (If you have more than 8 strips in your weave, you’ll have more strips to work with but the process will be the same.)
- Trim excess pie dough and fold over, then crimp the edges as desired. Brush with egg wash.
- Bake pie according to recipe instructions, typically until crust is golden brown and fruit filling is bubbling in the center.

Hoh! All of a sudden it’s made clear! Of course it shouldn’t be that hard, but I always thought if I ever got around to making a lattice pie I’d just do really wide strips and make a tic tac toe kind of thing. But okay, starting in the middle and doing it in two halves is exactly what I needed to see. Also, I have been eating my weight in cherries these last few weeks and got a little sidetracked staring at your pie filling. 😀 Thanks for the lesson!
This is a seriously stunning pie! I’m sure it’s delicious, too 🙂
Pretty sure this is the prettiest pie I have ever seen!
Your pie looks gorgeous! Oh, how I love a fresh cherry pie. 🙂
Girl, you’re the best pastry girl I know! Love the beauty of this. Happy Fourth! Hope you’re staying cool.
I love a butter crust, and lattice is so pretty.
Thanks for sharing another wonderful recipe on lattice pie crust.It seems easy and simple to have a try at home.It saves many time. Get jeux porno en toute sécurité to play for more entertainment.
Thanks for sharing another wonderful recipe on lattice pie crust.It seems easy and simple to have a try at home.It saves many time. Get this link to play for more entertainment.