

Homemade Cinnamon Ornaments
These easy 2-ingredient homemade cinnamon ornaments are a fun holiday project ,especially with kids. Use them year after year on your Christmas tree or gift them to others. As an added bonus, they will make your house smell amazing!

Decorating a real tree is one of my family’s favorite holiday traditions! And I love all of our kitschy sentimental and homemade tree decorations. I first made a batch of homemade cinnamon ornaments over 10 years ago, and we still hang them on our tree year after year.
They’re made with just 2 basic ingredients— cinnamon and applesauce (though I also like to add cloves for more holiday aroma). You roll the “dough” out, cut into shapes, and then dry in a warm oven or at room temperature. Add a string or ribbon, and that’s it!
“I make these as a kid over 40 years ago and they still have their smell and in one piece!!! I love putting them up every year. Store stacked together, wrapped in paper towel and in a small box… making them for a Christmas craft fair this year! Wish me luck!⭐⭐⭐⭐⭐” —from Tiana
Table of Contents
- Ingredients & supplies you'll need
- How to make homemade cinnamon ornaments
- Storage instructions
- Get the tutorial
Note: Even though these ingredients are all edible, these are not edible ornaments! They harden similar to clay and are not meant to be eaten. This is the only “recipe” on my website that you cannot eat, and I know it’s a little unusual for me to be sharing an inedible craft. But I hope you enjoy this tutorial! Me and my family sure did.

Ingredients & supplies you’ll need
These handmade ornaments require just 2 ingredients, with an optional 3rd:
- Applesauce— I use unsweetened, just the cheapest brand at my grocery store.
- Ground cinnamon— You’ll need a cup or more, so look for a larger bulk container.
- Ground cloves— Optional, but I love the extra boost of holiday aroma.
You’ll also need: rolling pin, cookie cutters, baking sheet pans, parchment paper, toothpick or skewer, and decorative string or ribbon.
How to make homemade cinnamon ornaments
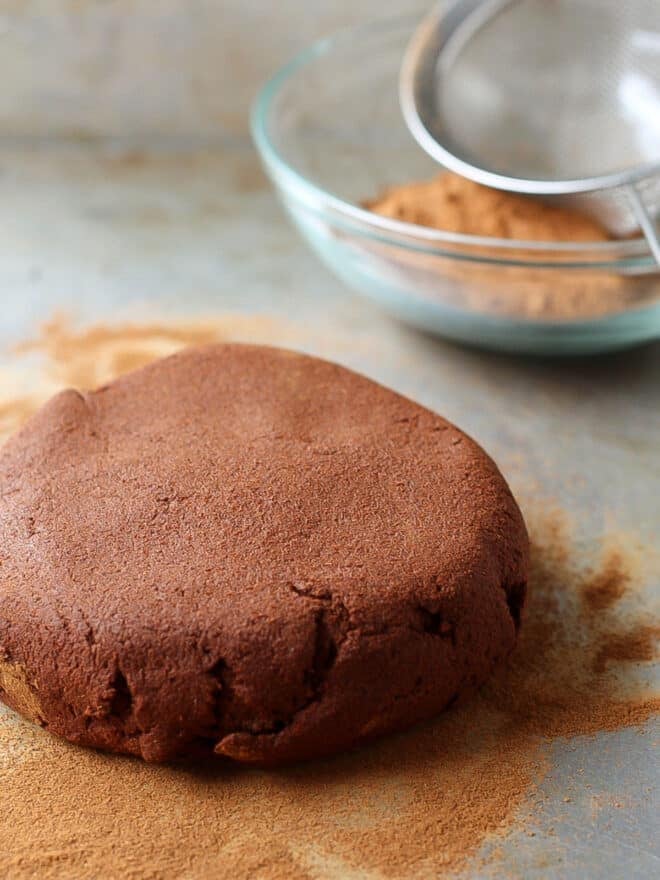
- Make the cinnamon dough. Combine applesauce and cinnamon. You’re looking for a slightly sticky dough that holds its shape, so add more cinnamon or applesauce if needed until you have the right texture. The amount of cinnamon you’ll need will depend a little on the applesauce you use, as some are softer than others.
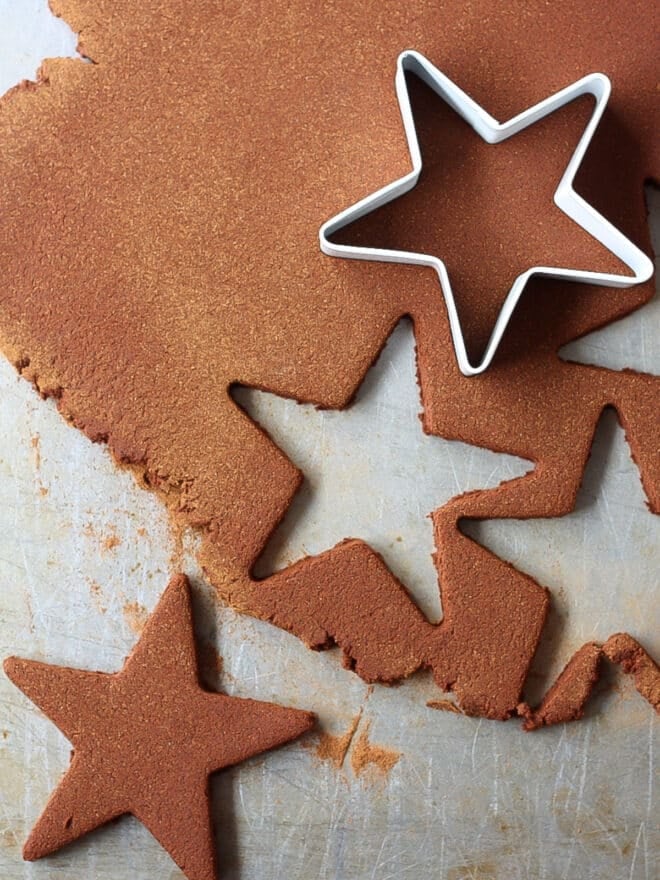
- Roll out & cut into shapes. Dust your counter with cinnamon, place the dough over it, and sprinkle it with cinnamon too. Use a rolling pin to roll out the dough to about 1/4-inch thick. Cut into whatever shapes you like, using cookie cutters or a sharp knife. Don’t forget to make a hole for the ribbon or string to hang it from!
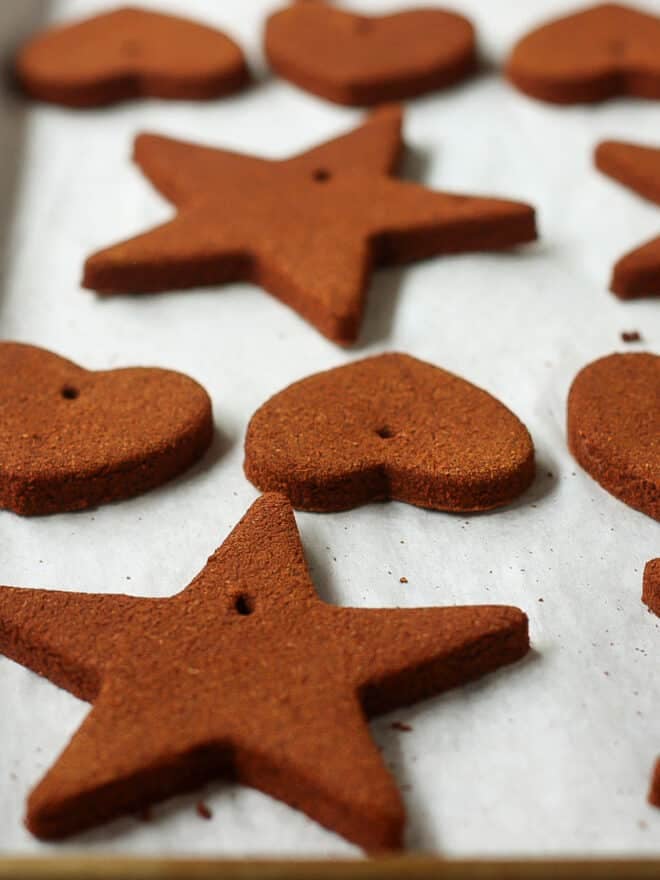
- Bake or let dry at room temperature. These ornaments can either be baked in a warm 200°F oven for a few hours, or you can leave them out on your counter top to dry over several days.
- Tie a ribbon or string for hanging. Once the ornaments are dried and hardened, use whatever ribbon or string you like and tie it through the hole you made.
- Hang on your tree! Or gift these to others. They’d also be great tied onto holiday gifts as part of a gift tag.
Storage instructions
These homemade cinnamon ornaments will last for years if stored properly with care. They can break if you’re not careful! I keep mine in an ornament box padded with tissue paper.
The ornaments lose a little of their aromatic potency over time, but look the same year after year!
Get the tutorial

Homemade Cinnamon Ornaments
Ingredients
- 1 cup applesauce
- 1-1 ¼ cup 130 grams ground cinnamon
- 1 tablespoon ground cloves optional
Instructions
- Preheat oven to 200°F. Line a sheet pan with parchment paper.
- In the bowl of a stand mixer fitted with a paddle attachment, combine the applesauce, 1 cup cinnamon, and cloves (if using). You want the dough to be able to form a ball without being too sticky. Add additional applesauce or cinnamon if needed. You can also mix the dough by hand.
- Sprinkle a clean surface with cinnamon (like you would with flour while rolling out cookies). Place the dough on the surface and sprinkle with more cinnamon. Use a rolling pin to roll the dough to ¼ inch thick, sprinkling with more cinnamon to keep from sticking.
- Cut out into desired shapes and place on the prepared sheet pan so that they aren't touching. Use a skewer to poke a hole into each ornament (to attach string). Bake in the preheated oven for 1 ½ – 2 hours or until rock hard.
- Loop a decorative string through the ornament and hang on your tree.


I was wondering if I could use ginger instead of cloves ?
I don’t see why not!
I must share a funny tale about these ‘cookies’… I had made a batch of them to use a ‘bowl fillers’ and they were sitting on a plate on my kitchen counter. My father came for a visit. Soon after he arrived, we went out shopping and while we were in the car, he remarked “Daughter, you are usually an excellent baker, but those cookies you made were terrible. I almost broke a tooth they were so hard!” Oh my word, it took a few seconds to remember what cookies I had baked (I hadn’t!) and then it dawned on me they were the applesauce cinnamon bowl fillers!! He was not amused.
Oh dear! Your poor Dad! Kind of a funny story though, thanks for sharing. 🙂
My kids and I loved making these. I think we will have to do another batch before Christmas! I gave them to my yoga students this week and then had to get the recipe up on my site to share! Check it out and thanks for the inspiration. https://www.shannoncrow.com/cinnamon-christmas-tree-ornaments/
Any tips for someone who doesn’t have a stand up mixer?
We don’t have a stand up mixer, but used our hands. The kids loved that part!
I made these years ago when my daughters were little. Every year we took them out to put on our tree, we rubbed sandpaper across the back to freshen them up.
Enjoy the memories,
Dawn
These look awesome! Have you tried painting designs on them? I’m just wondering how well the paint stays on.
I haven’t, though I’m sure you can find some craft paint that will work just fine. Great idea!
I absolutely love this! My mom made these about 22 years ago when my eldest sister was a baby. We still have them, and they still smell amazing!
I also made these cinnamon ornaments 20 years ago with my kids, now Its Feb 21, 2015 and I will make them with my grandson. I did use glue 2 tab. After baking them we used fabric and craft paint, put dots of paint on xmas tree ornaments then put small rhinestones in the center of the large dot dried in about 24 hours. they are beautiful, also used Tulip colorpoint paintstitching to decorate, any fabric paint will work. Kept them in a plastic container in the attic with my Christmas decorations for 20 plus years, and still to this day when I open them they look and smell great. Its a fun thing to do any time of the year.
this is the best sight. so simple. yet so beautiful. thankyou!
I made these tonight! I followed the recipe but I doubled the ingredients. The dough was wet & sticky so I added more cinnamon & then decided to use my mixer wondering if it would thicken. I don’t have a paddle so I used my beaters which made it bigger & airy & kinda like a whipped frostine (whoops!). I didn’t know how to salvage them so I took my 11 year olds advise to spread them on the cookie sheet w parchment paper. We let them dry for 5 or 10 minutes in the oven (they began to dry out fairly quickly). When they became more solid, we cut the shapes & ribbon holes & put them back in to dry. I think they should turn out well! Although, they make break easier & probably aren’t as smooth as if we had been able to roll them out. *Thanks for sharing! It made 30+ medium sized shapes. If we could’ve rolled the dough, less would’ve been wasted & it would’ve made a few more.
Love this recipe! Mine turned out great, except they sort of warped in the oven. This is my second batch. I made them a little thinner so maybe that’s why.
BUT with my first batch, I think the parchment paper absorbed too much moisture from the cookies, which caused the paper to warp in the oven and created small perpendicular lines across one side of the cookie. Any thoughts? Perhaps air drying them might fix that…
I followed the measurements exactly and had them mixing in my stand mixer with the paddle attachment. I have been adding a ton of extra cinnamon to try to get it to become a ball but it’s more like whipped cream. Help!!!
I made these last year with glue and apple sauce and they turned out wonderful, the smell is still awesome. My kids and I used glitter glue on them and they turned out great. Thank you for posting the recipe . I’m making them again tomorrow for the teachers 12 days of Christmas baskets.
what am i doing wrong?!!! i measured it all what you wrote.. and its not forming in a ball, and i used a mixer… HELP- I’m a teacher of the deaf so this is perfect for my kiddos on monday but i can’t get it into a ball.. what am i doing wrong?!!
I had to mash mine in to a ball with my hands and add a tad more applesauce because it was too dry… it is also taking over the 2 hours to cook in the oven. I added two tablespoons of glue to them as well to make them harder (recommended in another similar recipe)
Just wondering can you refrigerat any leftovers if you don’t use all