How to Make Foolproof Flaky Pie Crust
The flakiest all-butter pie crust is easy to prepare and practically impossible to mess up with my tried and true recipe. I promise you’ve never made pie crust like this before!
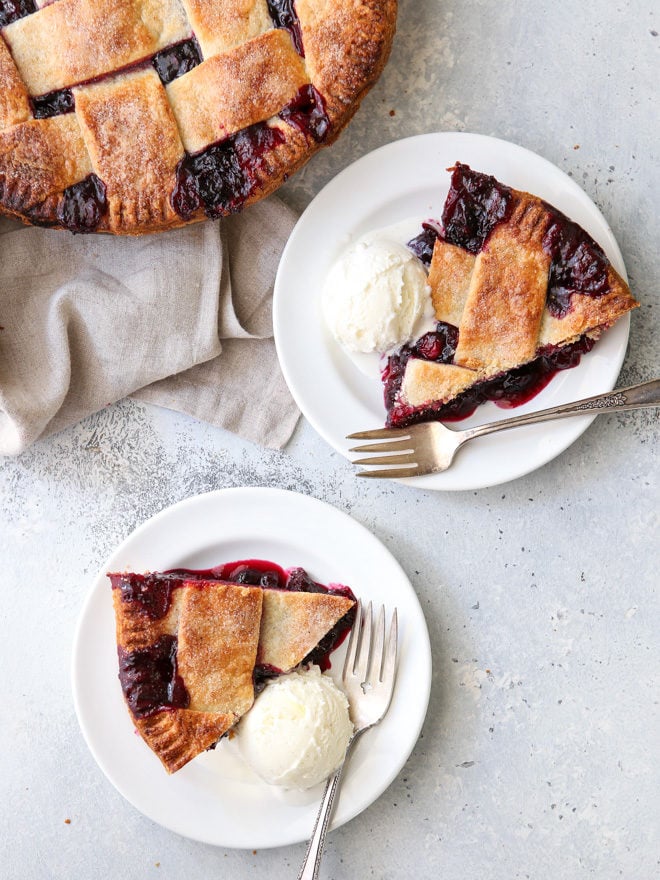
This flaky pie crust is my go-to for all of my pie baking and I’ve probably made it hundreds of times. I know there are a lot of recipes and opinions out there when it comes to pie, but this is the crust that never fails me.
It’s flaky and full of flavor. And if making pies intimidates you, this foolproof method is a great place to start.
This full tutorial has been on my site for almost 10 years and is one of my most popular posts, and now it’s been updated with even more photos, tips, and a video!
More pie baking help:
- The best tips for making perfect pies
- How to blind bake pie crust
- How to make pie crust in the food processor
- How to prep and store pie crust in advance

Ingredients you’ll need
Let’s get started! Here’s everything you’ll need to make pie crust (full recipe below):
- All-purpose flour
- Unsalted butter
- Coarse salt
- Cold water
Variations:
- Add granulated sugar to compliment the sweetness of a fruit or creamy pie. If I’m making a dessert pie, I always add it.
- My favorite way to make this recipe is with buttermilk instead of water. So much flavor! Click here to see my buttermilk pie crust variation.
How to make foolproof flaky pie crust
There are three ways I know of to make pie crust:
- Cutting the butter into dry ingredients with a pastry blender. This is probably the most common method.
- Using a food processor, which is great if you’re short on time (click here to see my food processor tutorial).
- By rolling out the butter into the dry ingredients (the method I’m going to show you here).
In my experience, rolling the butter into the dry ingredients is a guaranteed way to get a flaky pie crust. Those flat sheets of butter layered within the dough melt and release steam as the pie bakes, leaving behind little pockets of air, and lots of flakiness.
This method takes a little bit more time, but only about 5 additional minutes, and it works!
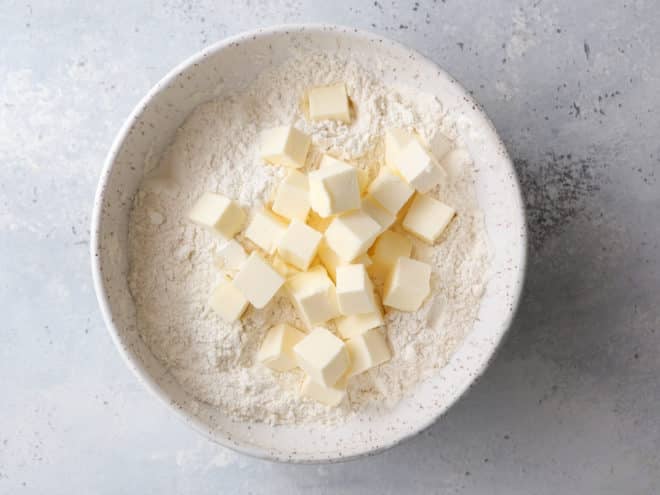
Step 1— Combine dry ingredients and add butter
Combine the flour, salt and sugar (if using) in a bowl and add the cold butter cubes. Toss until all the butter is coated in flour.
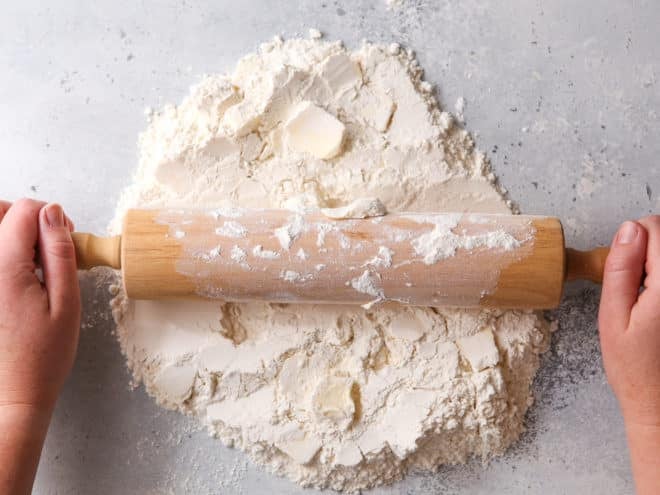
Step 2— Roll butter into dry ingredients
Dump everything out onto a clean surface. Use a rolling pin to flatten the butter cubes and roll them into the dry ingredients. A bench scraper is handy to bring it all back together into a pile, and also to remove butter from the rolling pin as needed.
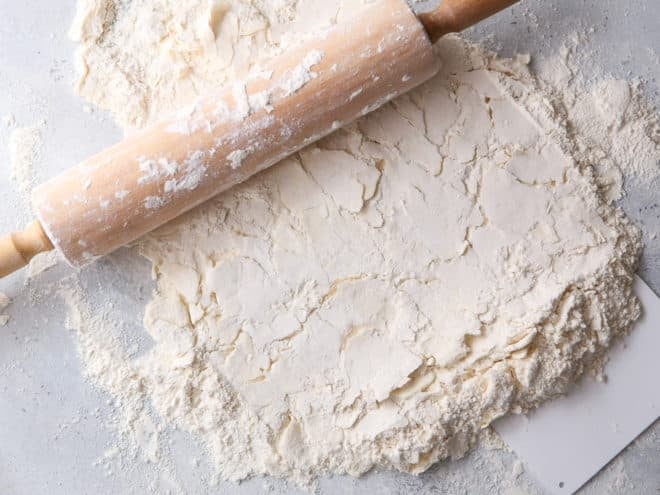
Keep rolling until all of the butter has been rolled into the dry ingredients. The goal is to have thin sheets of butter visible throughout the dry ingredients. Break up any really long sheets of butter with your bench scraper or a knife.
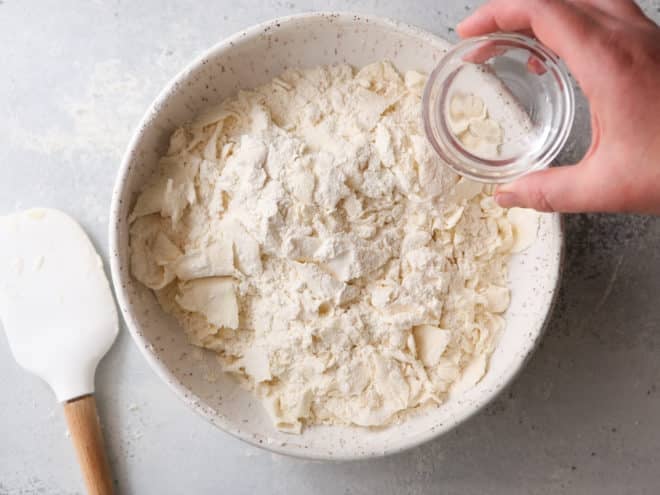
Step 3— Add water
Gather up the mixture and return it to the bowl. Place the bowl in the freezer for a few minutes if needed, just to get everything cold again.
Then, make a well in the center and add about 2-3 tablespoons of cold water.
Use a large spoon and then your hands to bring the mixture together into a ball. If necessary, add more cold water 1 tablespoon at a time. I always need to add more water, anywhere from ¼ cup – ½ cup total, but it’s different every time and so I start with a small amount and slowly add more. Adding too much water will make the dough sticky and produce a tough crust.
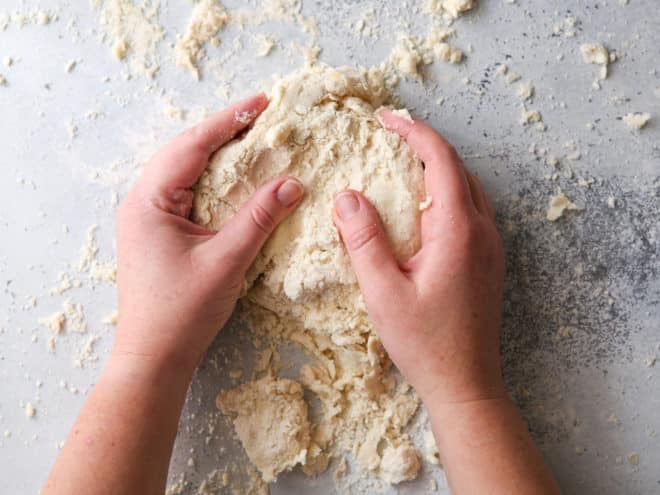
Step 4— Form dough into disks
The dough should hold together in a ball, but a few loose crumbs are okay. I like to dump the mixture out onto a work surface to bring the dough together with my hands. You don’t want to over-work it, but a little kneading and handling is just fine.
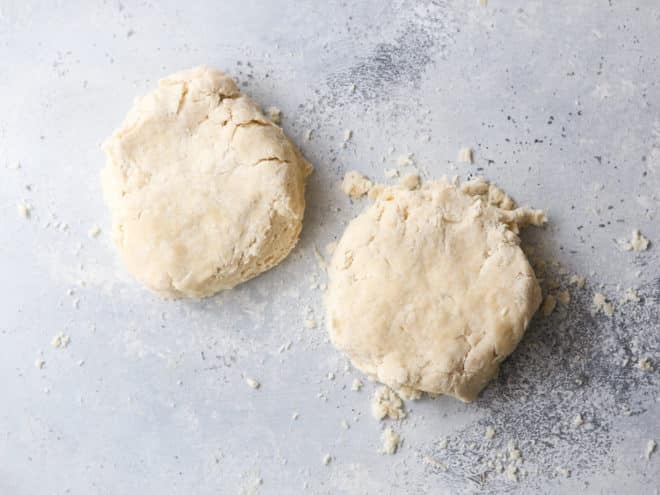
Divide the dough in half and flatten each into a disk. Cover with plastic wrap and chill in the fridge for at least 2 hours.
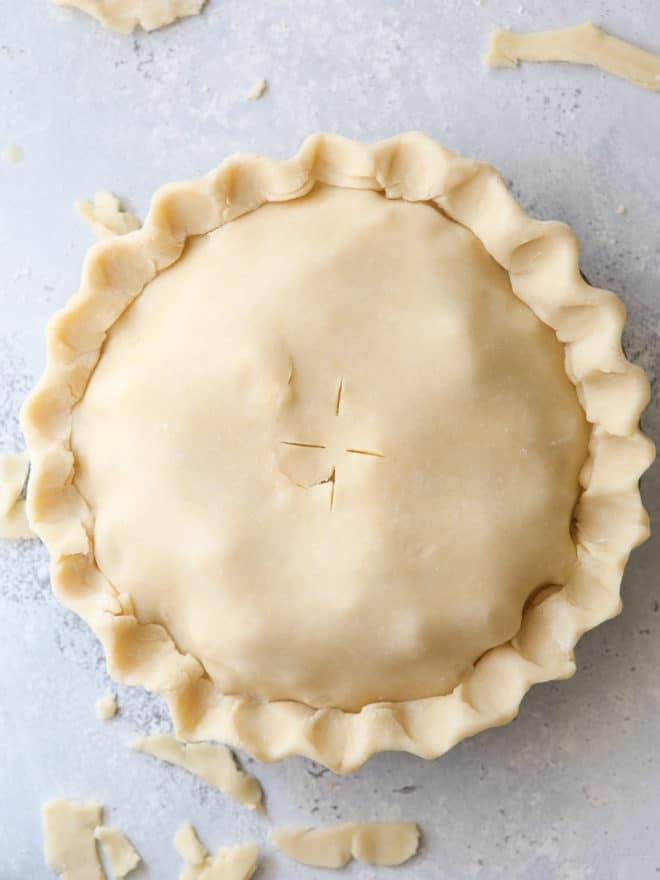
Then, you’re ready to bake a pie!
Pie crust tips
- Pie crust dough will keep in the fridge up to 5 days and in the freezer (double-wrapped) for up to 2 months. Thaw overnight in the fridge.
- Making pie crust ahead of time is a great time saver! For example, I usually make pie crusts for Thanksgiving 1-2 weeks before so it’s one less thing to worry about in the busy days before the holiday.
- This recipe can be cut in half for a single-crust pie.
- Pie crust needs to chill in the fridge before you use it, do not skip this step. It hardens the butter, making sure it does not absorb into the flour, ensuring it creates those lovely flaky layers. Chilling the dough also softens the gluten in the flour a bit, helping to tenderize the dough a bit.
- If you need to “blind bake” or partially bake a pie crust, I have a full tutorial on how to blind bake a pie crust too!
- If pies intimidate you or they just don’t seem to come out right, be sure to check out my best tips for making perfect pies. I share solutions for the most common pie baking problems.
- Here’s a list of my favorite pie tools.
My favorite pies to make with this pie crust
I have dozens of pies in my recipe archives, but these are a few faves!
- Mile High Apple Pie
- Cranberry Blueberry Pie
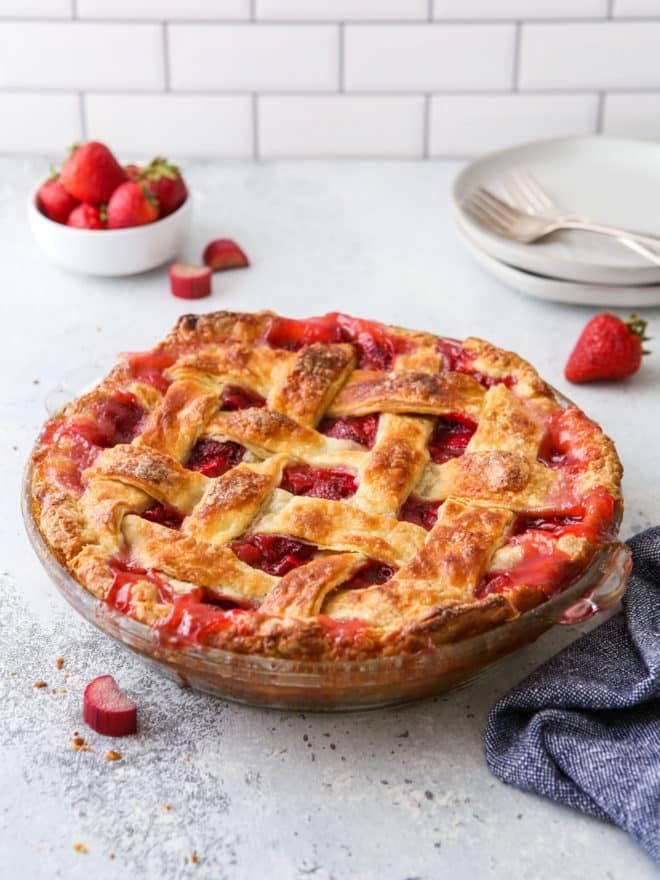
- Strawberry Rhubarb Pie
- Apple Pear Praline Pie
- Black and Blueberry Pie
Shop tools for this recipe
This recipe was originally published November 2013.
Foolproof Flaky Pie Crust
Ingredients
- 2 ½ cups (300 grams) all-purpose flour
- 1 tablespoon granulated sugar , optional
- 1 teaspoon salt
- 1 cup (226 grams) unsalted butter , cold and cut into cubes
- ¼-½ cup (60-125 ml) ice cold water , as needed (see Notes)
Instructions
- Combine the flour, sugar (if using), and salt in a bowl. Add the cubed butter and toss to coat.
- Dump the mixture out onto a clean surface and use a rolling pin to roll the butter into thin sheets, combining it with the flour. Use a bench scraper to scrape the rolling pin and to bring the mixture back into a pile as necessary. Continue until all of the butter is incorporated into the flour. Mixture will be very flaky.
- Return mixture to the bowl and place in the freezer for 10 minutes to chill the butter.
- Remove from freezer and add ¼ cup of the ice cold water. Use a spoon and then your hands to stir the mixture until it comes together into a ball. If mixture is too dry, add additional water a tablespoon at a time. I usually end up needing somewhere between ⅓ and ½ cup but it varies each time.
- Divide the dough in two and flatten into disks. Wrap each disk in plastic wrap and chill in the fridge for at least 1 hour and up to 5 days. Dough can also be frozen (double-wrapped) for up to 2 months.

This pie certainly does look perfect! Great tutorial 🙂
It is by no means a fail proof recipe. I followed it to the tea and I bake a lot. Bs k to my tenderflake no fail recipe.. That one is truly a no fail recipe.
I followed this as I was making a single crust Lemon Pie for Easter. Terrible. The first one I put in the freezer before baking. Slid down the sides. The second was worse. I will never use this recipe again.
Hi Sheila, I’m so sorry to hear you had trouble with this recipe. When the pie crust slid down the sides, I’m guessing you were blind or par-baking the crust before adding the filling? I’ve had so much trouble over the years with par-baking pie crusts (and shed so many tears), but I’ve finally figured out how to do it successfully! It doesn’t really have anything to do with the recipe, so much as the method. You can see my full tutorial here (using this same pie crust recipe). I hope this will help you with future pie baking!
I’m stunned by how detailed you are for this great pie crust recipe! This makes preparing pie crust so much easier with all the visuals. What a great recipe, too – I’ve never heard of vodka used in pie crust and I love cooking/baking with alcohol so I’m excited about this idea! Will probably making a looooot of batches of this pie crust this fall and winter! 🙂
Hey try using apple brandy for your apple pies. Yummy
Wonderful tutorial! Gotta try it! xo
You have just solved the world’s problems with this tutorial. Seriously. I’ve seen vodka used several times in recipes, but the buttermilk is new to me. Okay, I’ve found another new fave. LOVE you for this!
First of all, I’m so intrigued because I’ve never seen a pie crust made like this before – I must try it!! I did try the vodka crust recipe from Cooks Illustrated a few years ago, and while it tasted good, it was so hard for me to work with and totally shrunk. But I think I need to give this a go!
Shrinking of piecrust while baking is caused by stretching the dough. When you are putting the dough in the pan resist the temptation to stretch it to fit. Instead, gently lift the sides of the dough and let it fall into the corners of the pan. Also, the piecrust needs to rest before baking. If I’m blind baking a crust for an open top pie, I usually freeze and put it in the oven frozen. That way my fancy fluting on the edge stays intact, and I never have the crust slump down on the sides.
This is just what I needed for my pies. I’m never satisfied with the way my apple pie crust turns out but when I follow this post, I’m sure it will turn out perfect. Neat idea with the volka. Thank you.
Hello Annalise!
I’ve never made a pie crust before so will try this out (minus the vodka). Hopefully it’s a keeper since I love pie! I was wondering though, is this pie crust recipe specifically for certain fillings: fruits such as apples / blueberries or is it good for creams such as pumpkin, banana cream / chocolate pudding? I wouldn’t want to make this and have the pumpkin ruin the crust.
Also, my husband’s family is part Mexican and sometimes they make something called an empanada during the holidays. I was wondering if you happened to know whether I could use this pie crust recipe to hold the fillings or if that’s a completely different recipe? Thanks in advance!
*If any other commenters happen to know the answers to my questions please feel free to let me know! Thank you!
Warmly,
Ashley
I use this crust for all recipes where a pie crust is required- fruit pies, cream pies, hand pies (like empanadas), etc. I haven’t ever had a problem using it in conjunction with various fillings. Use it if you like and come back and tell me what you think. Thanks for the comment, Ashley!
I came up with an idea to help with our annual HOA bake sale this year, I want to make fruit triangles with a sugar coating. Since the fruit filling is already cooked, do I still vent the dough?
Gary
Hi Gary! I would still recommend venting. That way the filling will have a place to bubble through without bursting through a seam. Hope this helps!
Absolutely gorgeous, Annalise!! I was lucky enough to try this crust and it’s delicious. Flakey, buttery & almost sugar cookie like taste. It was scrumptious. I’m going to have to try the trick of rolling the butter in the flour! Thanks for the great tips!!
Great tutorial. I’ll have to try your techniques.
This will be my go to pie crust recipe from here on out. Thank you for years of deliciousness 🙂
What a fantastic tutorial!
You’ve provided great detail and photos. I can’t wait to try it.
I am a seasoned cook but have never seen a pie crust this different. Pie is my one challenge that I have never mastered. Am so anxious to try this one.
Thanks for the great detail.
Hello Annelise,I found you on Pinterest and i love the detailed instructions and photos.I look forward to making your recipes.Keep up the good work.
Made this last night, turned out great! I was worried because my mixture seemed too dry to form a “ball” as shown in the picture (it wouldn’t hold together) despite adding 3+ tbsp of vodka. But the end product was flakey and wonderful!
This happens to me sometimes too, every batch of crust is different. But after chilling, even the crumbliest dough seems to roll out well and turn out flaky and delicious. So glad you had success!
Hi Annalise! The oblivious non-American I am, I’ve never made a pie crust before, I’ve not even had a genuine pie whatsoever in my entire life yet. But also the blog-reading girl I am, I figured pie must be delicious, and I also figured with my mom’s birthday today and also my own coming up in ten days I needed to make a pie (also it’s almost Thanksgiving, and I always look for excuses to bake). With my own pie crust. I was pretty afraid of pie crusts since every single person who writes a blog about baking always goes “I used to be afraid to make my own pie crust from scratch” or “I still am afraid of doing that” – but also they always go “But then I discovered this special pie crust recipe, go try that, don’t be afraid of making your own pie crust from scratch”. So I tried yours because it seemed to be the least suspicious method to me and made an awesome Pecan Pie from that (Hello, lover). While it’s still cooling down, I’m a hundred percent sure that’s it’s going to be a huge success. The pie crust turned out to be perfect, not too wet, not too dry, overall awesome and this is definitely not going to be the last pie I’ve made. Thank you so so so much for the recipe!
Lots of love from Germany! =)
Thanks so much for the comment Jodie, I’m so glad you baked a pie! I bet it’s delicious. Enjoy!
I am definitely going to try this recipe. Thanks for the details and pics and the great information about the dough. One thing I do with left over dough is make cinnamon and sugar pinwheels. Roll out the extra dough, spread a very thin layer of butter on the dough and then shake some cinnamon and sugar on the dough. Roll up the dough to form a long tube and then cut the tube to make pinwheels. You can then place them in a pie plate or cookie sheet and bake them in the oven. They are really good. My mom always made these when making pies, and everyone would fight over them!
LOVE this suggestion, thanks for sharing!
Hello Annalise!
I have recently conquered my fear of making pie crusts from scratch and stumbling upon your tutorial I am eager to test and improve from my previous attempt. I previously used a processor to blitz together the butter and flour but since my processor was too small it barely did the job. I will be trying out your method this weekend for my apple crumble pie!
I have a slight concern that hopefully you could answer. Where I come from buttermilk is very hard to come by, and extremely expensive if it’s even available at all. Can it be substituted at all with regular milk (even if it means losing the unique flavor)?
Greetings from Hong Kong!
Hi Alvin! Feel free to substitute the buttermilk with whole milk or even water, though since they are both a little thinner than buttermilk, start with 1/3 cup, adding more if necessary. You can also make your own buttermilk with whole milk and a lemon. Place 1/2 tablespoon of fresh lemon juice in a liquid measuring cup, then add enough milk to make 1/2 cup. Let sit for 5 minutes, and voila! Good luck!
Hi Annalise,
I love your blog. Thank you for sharing! My question here is about the weight of the flour in this recipe. One cup of all purpose flour weighs 120 grams, so 2.5 cups would be 300 grams. Your recipe says 2.5 cups (375 grams). Can you please clarify?
Thanks!
Thanks for the comment Carrie! That was a math error I thought I had corrected long ago, but I guess it never took. It’s definitely fixed now!
My name is Hannah. I’m thirteen years old, and really, really looking forward to using this recipe-it looks fantastic! I’ll be making it for my dads birthday today, actually, for some lemon meringue pie.
I would really like to see some of your end results with this pie crust recipe-do you think you might be able to post up a pic? It would be greatly appreciated.
Thanks! ;D
Hi Hannah! Thanks so much for your comment. Your Dad is one lucky guy, lemon meringue pie sounds like a great birthday treat! If you look on this post, right above the recipe, I have links to several other recipes where I’ve used this pie crust and posted pictures of the final product. Hope this helps!
Pie crust is something I always had trouble with. I am so looking forward to trying this. Thanks!
Good luck! Please come back and tell me how it goes! 🙂
Hi! Just wanted to let you know that I found this recipe on Pinterest while searching for the perfect crust for my new pie recipe! Go check it out! The pie couldn’t have been as great as it was without your flaky recipe to support it!!
https://asylummom.wordpress.com/2013/07/24/the-very-best-peach-crumble-pie-with-caramel-whiskey-sauce/
Gorgeous looking pie! Peach, caramel and whiskey?! Come on, you’re killing me. 🙂
It’s worth trying! I took it to a local culinary friend here to test the new recipe and his exact words were “That shit is delicious! Don’t change a thing in that recipe!” He LOVED your crust, too! And so do my kids, who keep taking the crust bits off the ends of my pie >_>
Hi Annalise!
I’ve just made this, and it’s wonderful, thanks a lot for your tutorial. I’ll put it on my blog! I’ve already wrote about your chocolate cake (the one of Julia Child)
Your blog is really nice! I love it!
Thanks,
Carlotta
I stumbled across this the week before Thanksgiving, how lucky am I? Pie crusts have always been my ‘eeek’ thing…just threw some out of my freezer from last year (shhh, don’t tell) that I had made and they didn’t turn out to my liking. I’m so trying these next week and will let you know how I do! Thanks so much!
Just wanted to stop in and say that I used your piecrust recipe for Thanksgiving pies. I followed the steps exactly and it was a breeze! It would have been better if I had one of those scraper things, but either way it turned out fabulous! Thanks so much!
I’m so glad to hear the tutorial worked out for you and you enjoyed the pie crust! And yes, a bench scraper is an absolute must, maybe a stocking stuffer idea? 🙂
I would love that idea. Will you by chance be putting together a post with your favrite Holiday recipes? I would be all over that one!
Hi Annalise,
Thank you so much for this post!!! It was my first time making a traditional pate brisee (I’ve only tried a spelt flour pie crust before) and your pictures & instructions helped soo much, it came out perfectly delicious! And the process was enjoyable as well 🙂 Loved your tip about rolling out the butter into thin sheets–thank you so much!!
Hi!
I’m 17 and my girlfriend and I are competing with different dishes – and this week it’s pie! She has been making pies for years and this will be my first… :$. I’m looking forward to using this crust and I’m sure it will impress 🙂 I’ll let you know how it turns out!
You have given me a chance at this contest 😉
Thanks,
William
Amazing tutorial, thank you so much for sharing it! I’ve always been a little intimidated by pies and I’ve never been completely satisfied with the final results I got. So I can’t wait to follow this easy step-by-step method and see if things get a little better!
I have just one question: is brushing the top of the pie crust with the mixture of egg and water a necessary step or can I go without it?
thanks so much again!
Not at all necessary! Just an extra step I usually take. Feel free to not do it though. And please let me know how pie baking goes! I’d love to see a picture too! 🙂
Nice job with the tutorial, Annalise!!
Fantastic tutorial and oh so simple? Perfect timing for me since I used to rely on Betty Crocker and then they went and changed their pie crust mix. Been looking for a reason to start making pie crust from scratch so I plan to start with this one! Thank you!
I love to make pies. I think pie crust doesn’t have a great flavor because I always make it with Crisco.I think butter would give it a better flavor. Going to try this. Thank you
I’m an all-butter pie crust gal 🙂 I hope you’ll give it a try and let me know what you think!
Hi Annalise,
I wanted to stop by and tell you that I have been using your pie crust recipe exclusively for over a year now. I am the dessert baker of the family and I even tossed aside my mother’s recipe for this one. This crust always turns out wonderfully and your instructions are fabulous! (ie I have never screwed it up!) Looking forward to using it for pies for Thanksgiving next week. I can’t decide what to make pumpkin, blueberry, apple? Too many choices! Many thanks!
Hi Genevieve! Thanks so much for taking the time to comment. I’m so happy to hear you love my recipe. Happy pie baking next week, I say bake them all! 🙂
Hi Annalise! I have tried (and failed) at many pie crust recipes, most recently a pumpkin pie for Thanksgiving…I’m sure a lot of it is user error 😉 Anyways, going to give yours a shot and hope I’ve finally found the one! Quick ? – I see many comments about vodka, but that is no longer mentioned in the recipe. Is that something you recommend using instead of water? Or do you use water/buttermilk exclusively now? Does it matter whether you use water or buttermilk? What is the difference, mostly flavor? Just wondering as I want to give it the best shot possible! Thanks so much 🙂
I have such a hard time with pie crust for some reason, this tutorial was amazing and my crust for my chicken pot pie turned out absolutely perfect and so flakey!! Thanks so much for this!
Hello,
After buying two very expensive, poorly made pies this Christmas, I’ve decided that I would try my hand at it.
I like your tutorial, but I couldn’t find anything about baking times and temperatures. For a single, pre-baked crust pie, how long and at what temperature? For a double crust, I assume that would be in the pie recipe itself?
The baking temperature and times will depend on the type of pie you’re baking, so follow the instructions provided by whatever recipe you’re using for the filling. Does that make sense? Hope this helps!
Yes.
Thank you for responding.
Hi!
I’ve just prepared a glorious Apple Pie with your crust, and it turned out so great, I’m amazed!
I live in Germany and have tried so many different recipes for pie crust, to get that American flaky style – none worked. Yours did! It’s perfect that it’s just butter, most other stuff used in American recipes I can’t get my hands on here. I used 405 wheat flour and weighed the ingredients according to your gram indications. I sifted the flour three times, because you can’t get all-purpose flour in Germany and I’ve read that American flour is pre-sifted. So since I couldn’t get the flour to have the volume as yours did, I just used the weight and wow, that dough was working!
It’s the first I tried that I was actually able to transfer to the dish without it ripping. The way you rolled the butter into the flour+sugar: brilliant.
I pre-cooked my apple mixture slightly, so that the apple bits would remain their shape (and used two different kinds, as according to the tips of the American test kitchen).
I pre-heated my oven to a higher degree than I normally would (220 Celsius) and baked the pie on the lowest step for 10 minutes, then reduced the heat to 175 degrees and baked for 50 minutes. It looks perfect. So flaky.
I am so grateful for your recipe, you cannot imagine 😀
I’m confused….I don’t see where there is buttermilk or vodka used in this recipe. Yet, I see comments about them? Please advise.
Hi Tami! As it states in the post, the recipe has been updated with improvements since I originally posted it several years ago. I no longer feel like vodka is necessary so I’ve left it out of the new version. And I’ve listed water as the liquid instead of buttermilk as it’s more universal, though I do explain in the text that buttermilk is a great flavor variation that can be used.
Can I make a mince meat mixture for this pie crust!!!!
Hi Patricia! You can use this pie crust recipe for any kind of pie you wish!
Hi Annalise this pastry recipe is the best!easy to make I have made all kinds of pies small and large sweet and savoury and it never fails me thank you so much! 🙂
Ok, I’m going to try this today to gear up for the 4th of July Pie contest this weekend. Wish me luck, I’m a destroyer of all things pie crust (but practice sure can’t hurt and my husband is going to we pretty pleased! LOL). Thanks for the picture tutorial, it was needed on this one.
What are the baking instructions ?
It’ll depend on the pie you’re baking! Refer to the pie’s recipe instructions, this is a tutorial for crust only.
I enjoyed method of rolling out butter with flour. When adding the water is most difficult for me. After the half cup water seemed very crumbly and not holding together well. So I added 2 more teaspoons water. Was able to get into ball but sticking- is it worth proceeding? The water part always hard for me, am afraid to over handle dough. Any tips?
Hi Elaine! It’s okay if the dough is a little crumbly, though you should be able to shape it into disks. It’s best to add a few drops of liquid at a time to get the dough just right. If it seems a little too wet and sticky, you probably have over-watered and the crust may be tough, but you can certainly try it and see how it goes!
I made this crust yesterday for a chicken pot pie… it was buttery and flaky and golden brown and perfect. This is definitely my new favorite crust recipe! Thanks!
I have been searching for the perfect pie crust for quite some time yet have not found one. I’m going to try this tomorrow along with the ‘mile high apple pie recipe.’ Hoping for a winner this time. It looks delicious. I’ll let you know how it turns out.
Hi Annalise, I decided to try this pastry today for an apple pie, it was fun to roll the flour and butter mixture and the pastry rolled out beautifully, no tears or cracks and I simply folded it in half and lifted it into the pie pan. The finished pie was the best I have ever made. I was amazed at the flakey, buttery layers not to mention the rich buttery taste. Bye bye crisco and hello butter pastry, love it. One question I have been researching, can a filled pie be refridgerated to aid a decorative edge maintain it’s shape when baked and if so for how long before baking, thankyou
Hi Margaret, I’m so happy to hear you enjoyed my recipe and technique. Thanks for the comment! I wouldn’t recommend chilling a filled, unbaked pie, as the filling will make the bottom crust soggy. Perhaps you can chill the top crust after you roll it but before placing it in top and crimping?
I have tried other pie crust recipes that were disasters. Your recipe and tips were the bomb and thanks to your detailed instructions and tips I finally was able to make the perfect pie crust Thank you!
What oven temp do you recommend for apple pies with this crust?
I usually bake my pies at 400 degrees F.
I made a pie dough in my food processor and it came out beautiful. I let it cool in the fridge. I could not roll it out, it just cracked and fell apart, I had to piece the dough in the pan. What was wrong.
Hi Patricia! I’m sorry to hear you had trouble with this recipe, and I know how frustrating it is when a pie crust doesn’t turn out. I can’t say for sure what went wrong, but I’m wondering if there wasn’t quite enough liquid to bind the crust together? Also, my crusts are always rock hard when I take them out of the fridge so I let them sit on the counter for about 10 minutes, which seems to make it more pliable and less likely to crack. Something to try next time!
I tried the crust recipe, must have done something wrong, it didn’t come out right this so hard and weird looking. Will try again tomorrow.
Hi Annelise
Can’t wait to try this recipe! Can see by the comments it Will be a winner!! Trying desperately to ‘find’ your recipe for the bundt carrot cake with cream cheese swirl and your choc cake which has been mentioned in the above comments, for some reason I can’t open it even tried the Betty Crocker site?? Please help.
Thanks Kathy
Hi Kathy! You can find the cheesecake-swirled carrot bundt cake recipe here. I’m not sure what chocolate cake recipe you’re looking for? You can find all my cake recipes in my recipe archives.
I must be pleased for sharing your ideas. Thank you for the good writes up. It’s a brilliant job.
I had a really hard time getting the dough to come together and I genuinely thought I over mixed the dough and made it tough. When I baked it though it turned out really nice! I’m so glad I know how to make my own pie dough now 🙂 it was delicious with my buttermilk veggie quiche.
I’m so glad it worked out! Mixing in the liquid is always my least favorite part, and I always stress about whether I’ve added too little or too much of it. So you’re not alone! Happy pie baking! 🙂
I’m totally in love with this recipe.
Annalise have you ever use vegetable shortening in your pie crust.
thx
Paula
I’m not sure I ever have! If so it’s been years. I find that when handled properly, an all-butter pie crust yields so much flakiness, and without compromising any flavor!
You are a genius!!! Just did a trial run through this recipe before trying it out on some Thanksgiving pies! I have never been able to master homemade pie crust.. until now ? I told my kids- we’re eating real pie this year guys! Haha. Not sure where the not-so-happy commenters went wrong but I think it’s fool proof! Thank you!
Also, you recommended non-salted butter but all I had was salted butter… so I only put 1/2 tsp of salt. It seemed to do the trick.
Again- thank you so much! Happy Thanksgiving ?
I work at a US Park Service Historic Site and bake in a early 1800’s wood fired brick oven. All of he bread and pies and pastries. I tried this method some years back and consider it a God Send. The one part of making pastry dough that is always a BOOGER is cutting in the butter. This method solved all of my problems and worked the first time and a bazillion times afterward. Thank you so much for this method. I also teach it to kids that work in the kitchen and they pick it up right away and make perfect pies. (Crostatas, and Galettes) And I am a ……………. “guy”.
Hi Dennis! I love this, thank you so much for sharing! I would love to see and bake in that oven, that sounds so fascinating. I’m happy to hear this recipe was such a success! 🙂
The way you prepare it is great, very easy to understand and apply, I have succeeded with so many things you teach. Thank you for making me a good chef
Tonight I mixed up a crust using the method of mixing the flour and butter directly on the table with a rolling pin. The dough is now resting in the refrigerator until tomorrow night.
I’ve tried numerous other methods with varying amounts of success. I know I over mix the fat and use too much water. Methods that work for others don’t necessarily work for all. I took a pie making class with a well known instructor. I’ve not been able to duplicate my success from the pie I made in that class. She told me I over mix the fat and flour. Maybe using this method will help me.
My method is out there, and I’m hoping this is it.
I hope this is it too!! Please come back and tell me how it worked out!
The pie crust was a complete success. Tender and flaky. I will from this day forward mix the fat into the flour on the table with the rolling pin. Wow. Who knew.
Thank you for the instructions.
YAY!! Oh I’m so glad you had success with this method and recipe. I hope there is lots of pie baking in your future! Thanks for feedback. 🙂
You have creative hands and minds of great food, really the recipes you share I feel very delicious and beautiful, thank you for sharing these great recipes.
The information shared is very good, thanks to the author, it helps me a lot, I am looking for it.
Thanx for sharing.
Thank you for the info!
This is by far the BEST method of making pie dough (for me). Makes delicious chicken pot pies, and cinnamon sugar pie crust cookies. I also make jam filled pie cookies and the dough comes out so light, flaky, and rises so high it’s almost like I added a leavener.
Thanks so much for posting this.
I’m certainly enjoying your website! You most definately have some amazing stories!
http://www.medicalsearcher.net
Excellent post! Thank you for sharing this info!
http://www.quentinmedical.com
Very good post. I love this site. Keep it up!
I find it quite interesting for myself to thank you
Bois io game
Very helpful info! Thank you for sharing this!
Very good post. I love this site. Keep it up!
Weekly Health
For managing your mcafee online account go to mcafee.com/myaccount login page and download and activate your mcafee antivirus…
Thank you for the post as It helped in my quarantine:)
I’ve added how it look and taste to my website – https://dsdir.com/
Best PIE CRUST ever. YOU MADE MY DAY.
Added recipe online on https://definatetech.com/
I found today this new recipe.
Look so delicious !!! I want to eat it all at the first moment once I see them.
Thank you very much for sharing these foods ..
. Awareness raising to the community is also a crucial initiative that could help the community to understand more about nutrition and diseases brought about by foods.
Thanks for this info. In lockdown this will help in save time in making delicious food and mainly for save money.
So, Take care of yourself.
Thank you for making our quarantine time delicious.
This makes me craving more! I found this very delicious. Thanks for this article.
This is truly a great and easy recipe. Thanks for sharing it!
Thank you for sharing information. It a wonderful post.
very informative content to share..thanks for this wonderful post
looking so delicious..i want to try it yummy
helpful post thank you
http://www.tenzinghealth.com Your site has a lot of useful information for me, I visit it very often.
Your site has a lot of useful information for me, I visit it very often.
Tenzing Health
I have tried many recipes for pie crust this is easily the best and most consistent.
Most recently I tried it with Irish butter and the slightly softer nature of the butter made it even better. This is truly my “go to” pie crust .
This is now my ride or die pie crust recipe/method and has converted me into a crust lover. I use it most often for chicken pot pie, pumpkin pie, cinnamon-sugar pie crust cookies, and for jam-filled pie cookies.
Seriously, this seems to be the best way to make the most flaky crust.
This is flat out genius.
I’ve been baking all my life and this never occurred to me.
From now on I’m making my pie crusts with this method.
Big thanks
It will be great if you try some Asian Foods like the Bhindi recipe. Today I have made it and my children have enjoyed it much.
I’ve always had a hard time getting a flaky pie crust, and this recipe is now my go-to. Delicious!!!
Ok people… IF MY HUSBAND CAN FOLLOW THE RECIPE, IT’S A GOOD RECIPE. I’ve made this pie crust a few times using the food processor method, but I didn’t have time last week to make a pie crust for our pot pit so my husband stepped up (and he is not a baker). Knowing his history with cooking, I was incredibly hesitant. But I relinquished control and, to my surprise, he made the pie crust via the rolling pin method and it turned out EVEN BETTER then mine!! Maybe it’s something to do with the longer, thicker strands of butter when you roll it with the rolling pin, but man did it turn out great!
If you’re looking for one of the best, most versatile pie crust recipes, this is your go-to. Star it, favorite, i don’t care. Just make sure it’s easily accessible because you’ll want to make it again and again. Both food processor and rolling pin methods are outstanding. (But I really do recommend trying the rolling pin method. I made it today because I was curious. It take a little more time, but it’s easy and worth it!!!)
Wow, what a review! Thanks Sarah! I’m so happy to hear this method worked so well for your husband. It really is foolproof! 🙂
Good thing I put the pie on a parchment lined rimmed cookie sheet! The crust was put in the fridge for 1.5 hrs. after rolling out. I used the blind baking way and docked the crust before adding weights. The crust was too crispy after baking. I have so much trouble with all butter crusts regardless of which recipe I use! Have thrown many in the garbage.
Every since I found your sheeting technique several years ago, I’ve made all my crusts this way. I’ve used it for sweet/dessert pies, chicken pot pies, hand pies, and my favorite…pie crust cookies (cinnamon sugar, and jam filled). The crust comes out so flaky and tender every time. Thanks so much!
Thank you so much for the feedback! I really appreciate it. And I’m so happy to hear that this method works so well for you!
Can this recipe work eith gluten free flour?
I have not tested this recipe with gluten free flour, so I cannot advise. I’m sure there are plenty of gluten free pie crust recipes on the internet! And you likely could apply this rolling and cutting method into other recipes too.
I have problems with the butter oozing out (regardless if chilled 4-8 hrs/even freezing for one hour) and burning the bottom and edges of crust. In fact I can lift the whole crust without breaking! Help!
I have a problem with all butter crusts regardless of the procedure. I put the discs in fridge for 30-60 minutes. After rolling put pie pan in fridge for 30-60 minutes for single crust and 45 minutes for a filled double crust pie.
When I bake the crust or double crust pie all the butter comes pouring out and I end up with a crispy brown crust the snaps when I try to break off a piece. The double crust is the same. I’ve had to throw each away. I don’t know why this happens! Please help
Hi Sha! I’m sorry butter pie crusts give you so much trouble. Have you had this issue with this particular recipe? Not just the method, but the actual recipe/ingredients as listed here? I’d be happy to troubleshoot if you have tried it and it didn’t work for you. Feel free to email me at completelydelicious@gmail.com.
So great!! Candy Crush
looking delicious..i will definitely want to try
Discovering this website has been a delightful experience. I want to convey my appreciation for your efforts in offering such an excellent read!
I have had trouble with all butter pie crusts since coming into favor. I follow the recipe fully and when baking all the butter oozes out. The crust can be lifted out in one piece and is on the verge of being burnt after the allotted time. Please help before I try your recipe! The first time I made an all butter crust I wasn’t expecting all the butter running out and creating billowing smoke coming from my oven! What a disaster in November in IL! I’ll rate your recipe a 5 as I know your recipes are great. Please advise.
Maybe you just had a bad recipe previously? If you follow this recipe and instructions as written, I don’t see why this should happen. Reasons why butter might melt out: Pie crust wasn’t chilled properly, dough is warm when you bake it, etc. I of course can’t know what went wrong previously, but I stand by my pie crust, it has been made thousands of times by myself and others and it’s a winner! Good luck and happy baking.