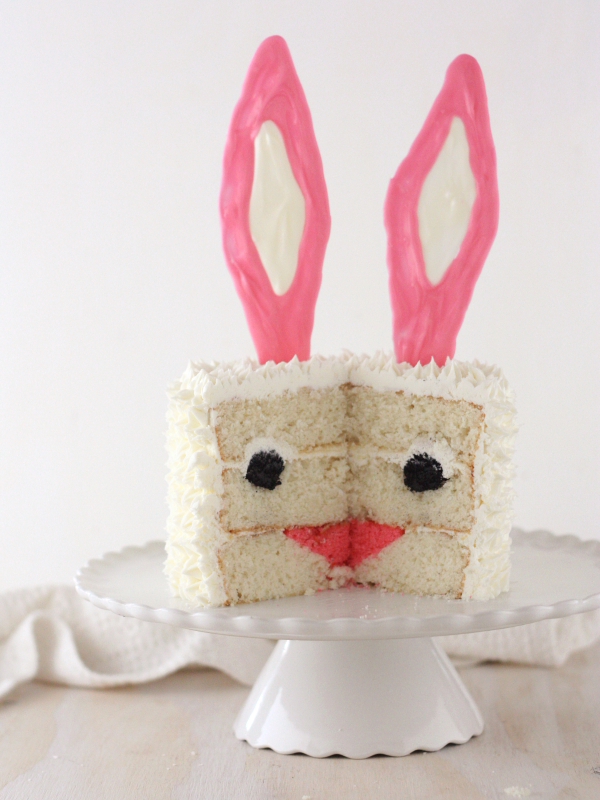
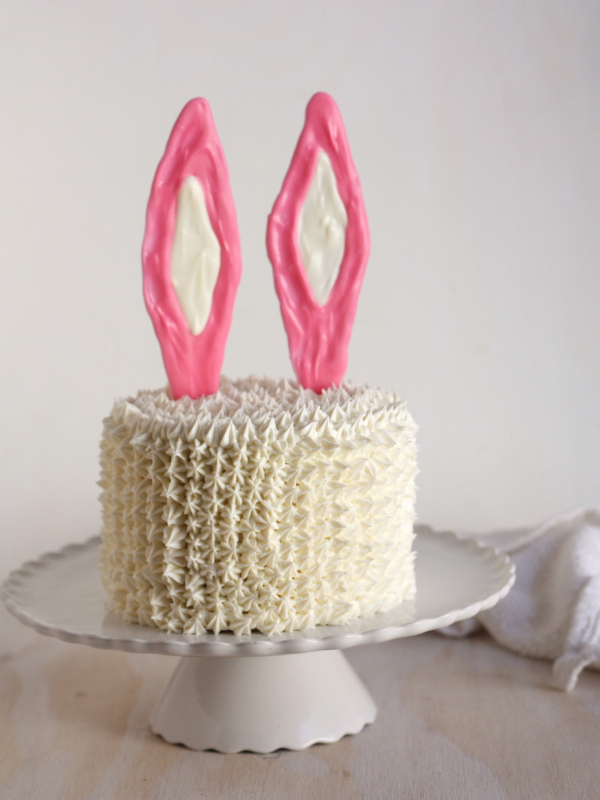
Bunny Surprise Cake
A simple and delicious white cake with a fun Easter bunny surprise inside— sure to be a huge hit with young and old alike!
For as long as I’ve been reading food blogs on the Internet, I’ve been in awe of the incredible cakes shared on I Am Baker (like this one, or this one, and this one too). If you are a follower of Amanda’s blog then you know as well as I do of her immense talent as a baker and artist.
So when I heard about her new cookbook, Surprise-Inside Cakes, I couldn’t wait to check it out.
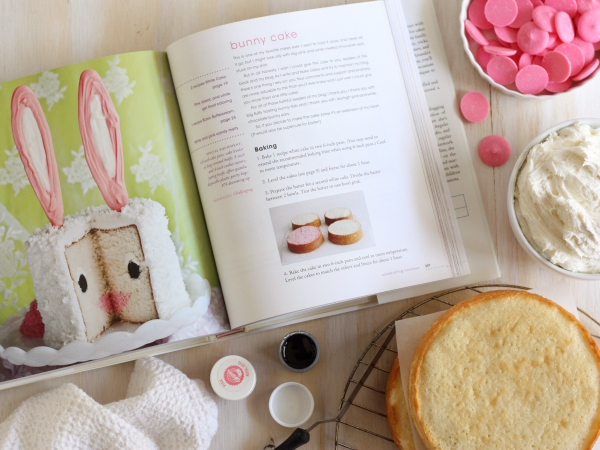
As I flipped through the book I was blown away by every amazing cake, but this bunny cake completely stole stole my heart. I was originally thinking of featuring an easier recipe from the book, but then I thought what the hell? I can totally do this.
And I did it! Thanks to Amanda’s very clear instructions and step-by-step photos. I must have looked over the recipe a hundred times and it paid off, the whole thing went off without a hitch.
You may think surprise cakes are too complicated, but I promise anyone can make one. All you need is attention to detail and confidence in yourself and the instructions. You’ll also need a free afternoon, they can take a while!
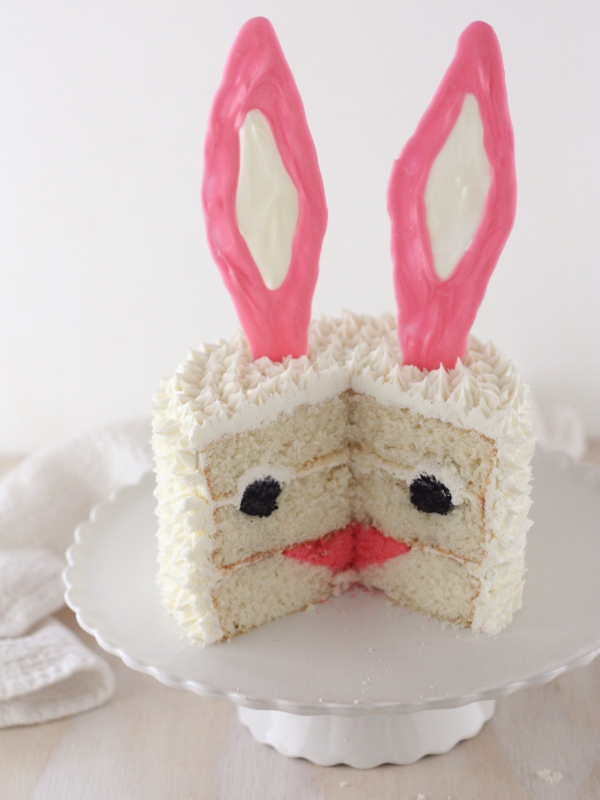
Not only did this little bunny cake turn out as adorable as I’d hoped, but it tasted great too! I think Amanda’s white cake recipe may be my go-to from now on. I almost felt a little guilty devouring the bunny’s cute nose and eyes, but they were too tasty not to.
A few notes about this recipe:
>> Amanda’s instructions for this cake indicate that you’ll need to use two recipes of white cake, however I had enough with just one.
>> When I make this again I’ll go ahead and make two recipes so that I’ll have enough batter for another cake layer at the bottom. I can’t stop seeing the bunny’s nose as a mouth, and I think that will help solve that problem.
>> Look for candy melts and gel food coloring at a baking or craft supply store. These items cost me about $5 total.
>> It’s a good idea to make 4 bunny ears in case 1 or more break in the process.
>> Read the instructions beginning to end before starting this cake. That will hopefully minimize any frustrations.
>> As thorough as I tried to be with the recipe and instructions below, Amanda’s book does a much better job explaining the process. Plus there are a lot of other great tips for baking and building layer cakes. So check it out!
Bunny Surprise Cake
Ingredients
For the cake:
- 3 cups cake flour (340 grams)
- ½ teaspoon salt
- 1 tablespoon baking powder
- 1 cup unsalted butter , at room temperature (226 grams)
- 2 cups granulated sugar (400 grams)
- 1 cup whole milk (237 ml)
- 1 ¼ teaspoon vanilla extract
- ¼ teaspoon almond extract
- 5 large egg whites
- Pink gel food coloring
For the buttercream:
- 1 cup unsalted butter , at room temperature (226 grams)
- 2 teaspoons vanilla extract
- Dash of salt
- 6 cups powdered sugar , sifted (1360 grams)
- ½ cup heavy cream (115 ml)
To assemble the cake:
- Black gel food coloring
- White gel food coloring
- 1 cup White candy melts
- 1 cup Pink candy melts
Instructions
To make the cake:
- Preheat oven to 350°F. Butter and flour two 6-inch round pans and line with parchment paper.
- In a small bowl, combine the flour, salt, and baking powder.
- In the bowl of a stand mixer fitted with a paddle attachment, beat the butter and sugar on high speed until light and creamy, about 3-4 minutes.
- Combine the milk, vanilla, and almond extract. Add the dry ingredients in 3 additions, alternating with the milk mixture, and mix after each addition.
- In a clean bowl with a wire risk, beat the egg whites on high speed to stiff peaks. Add the whipped whites to the cake batter in 3 additions. Divide the cake batter in half, and then divide one of the halves between the 2 pans.
- Bake until a toothpick inserted into the center comes out clean, about 25 minutes. Let cool in the pan 5 minutes, then transfer to a wire rack to cool completely.
- Re-butter and flour the pans and line with parchment paper again. Divide the remaining batter in half, and tint one half pink. Pour into the prepared cake pans and bake according to the above instructions.
- Once cakes are cooled to room temperature, cover in plastic wrap and chill in the fridge at least 2 hours and up to 3 days.
To make the buttercream:
- Combine the butter, vanilla, salt, 2 cups of the powdered sugar, and half of the heavy cream in the bowl of a stand mixer fitted with a paddle attachment. Beat until moistened, then add the remaining powdered sugar ½ cup at a time, alternating with the rest of the heavy cream until smooth and creamy.
To build the cake:
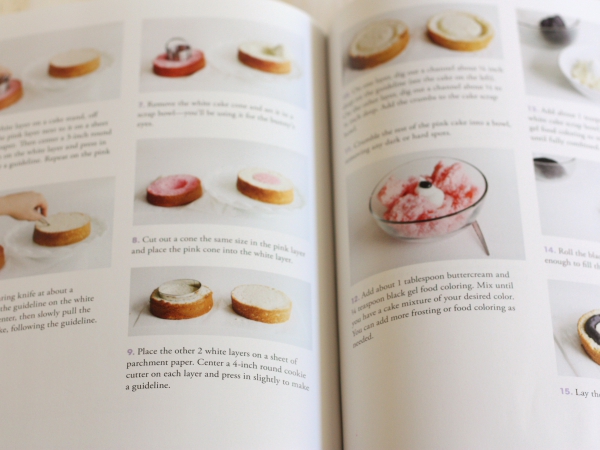
- Place one of the white layers on a cake stand, center. Center a 3-inch round cutter over the cake layer and press in slightly to make an indentation. Using a small knife held at a 45 degree angle, slice into the cake, aiming for the center. Follow the indentation around the cake and remove the cake cone. Repeat with the pink cake layer. Place the pink cake cone into the hole of the white cake layer.
- Use a 4-inch round cutter to make indentations in the remaining 2 white cake layers. Use the back of a spoon to dig a ¼-inch deep channel in one of the cakes, and a 1/2-inch deep channel in the other.
- Crumble the rest of the pink cake into a small bowl. Add 2 tablespoons of the buttercream and a little black gel food coloring and combine with a fork until uniformly black. Add additional buttercream and food coloring if needed.
- Roll the black cake mixture into logs thick enough to fill the cavity in the cake layer. Lay them into the cake layer with the deeper channel and connect them to fit evenly.
- Crumble all of the white cake scraps and combine with 1 tablespoon of the buttercream and a little white gel food coloring. Roll the white cake mixture into logs and then flatten with your hands to about ¼ inch thick. Place on top of the black logs, covering it completely.
- Spread a thin layer of buttercream around the edge of the cake layer on the cake stand, being careful to avoid the pink cake cone.
- Set the layer with the black logs on top and cover the edge with buttercream. Turn the remaining cake layer over and place on top, making sure the black log fits into the carved-out top layer.
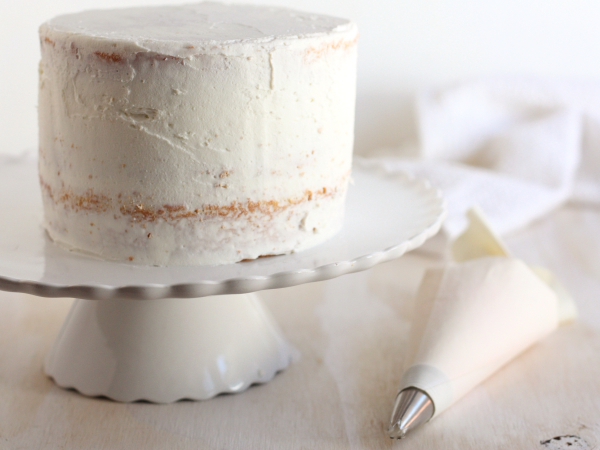
- Cover the cake with a thin crumb coat and chill in the fridge for 1 hour.
- Fill a pastry bag fitted with a small star tip with the remaining buttercream. Pipe small bursts of frosting over the surface of the cake, making sure they are fairly uniform in size.
- To make a bunny tail, pipe out a big ball of frosting at the back of the cake. Cover with small bursts of buttercream.
- To make the bunny ears, trace an outline of bunny ears onto a sheet of paper and then place that paper under parchment paper on a baking sheet. Melt the white candy melts in a zipped plastic bag in the microwave in 30 second bursts. Massage the bag to fully melt the candy.
- Cut a small hole in the corner of the bag and pipe out the inside of the ears onto the parchment paper. Use a small spatula to smooth it out, if necessary. Repeat with the pink candy melts. Chill in the fridge for 30 minutes or in the freezer for two minutes.
- Chill the cake until ready to serve and insert the bunny ears into the cake just before serving.
Notes
Disclosure: I was given a free copy of “Surprise Cakes: to review, though I was not compensated for this post. All opinions are 100% my own, as always.

I would make one for my husband because I love him!! #cheesylove
I’d like to make a surprise inside cake for my mil. She’s been ill and would love the treat.
I would make a cake just for me…jokes! 🙂
I would love to make a bunny surprise cake for my grandchildren.
I would totally make this bunny cake (or any suprise inside cake for that matter) for my sister! She would get such a kick out of it and would appreciate it more than any one else I know!
Oh my gosh, this cake would be the perfect surprise for my family on Easter morning when we have our family brunch!
My loving husband because he surprises me so much!
I would love to make one for my next family party! The kids would LOVE it!!! Thank you!
My husband :]
What a super cute cake!
I would like to make a surprise inside cake for my little cousin because I know she would be so in awe of it! Plus her little hands would be clapping 🙂
I would love to make a surprise inside cake
For my Mother who will be 89 next month!
My daughter. She just started a new job and is loving it!
I would make one for my nephew. His birthday is coming up next month and he loves cake!
Such a great cake for spring and Easter. So adorable.
I love the concept of that book. 🙂
My husbands 40th
I would make this cake for the women’s shelter. The kids would love it.
Something they would not forget.
I would like to make this for my kids for Easter. Thanks Annalise, I love your blog!
i would make a surprise inside for my sister’s birthday because she would enjoy the surprise and she’s turning 30.
I think to myself, “What could we have Annalise bring to the family Easter party on the 19th? Anything? Anything? If only she could bake ….” lol.
My mom. It would just put a smile on her face.
Would love to make one for my family!
I have an anniversary coming up that I would love to make one of these cakes for.
also, had you not mentioned it, I would have kept on assuming that the pink was the bunny’s mouth. Oops!
my fiance! she is always surprising me with treats. it’s time for me to surprise her!
I would like to make one for my mom, no reason needed!
What an adorable cake! This would be a perfect surprise for all at an upcoming Easter gathering.
My husband he has worked out hard for our family this month! I would love to make me an awesome surprise cake!!!
I’d bake a cake for my mom because she works so hard and deserves a surprise.
This is way cute!! My kids would love this on Easter!!
I’d love to make one for a friend’s baby shower! It would be fun to reveal the gender as the cake is sliced!
My Sister’s birthday is in April. She would be so pleased
with a Surprise Cake.
My husband because I love baking for him. Thanks for the chance to win!
I’d make this for my kiddos – they’d love it!
I would make a surprise inside cake for my three year old niece!
I’ve been invited for Easter at a home with young children. This would be a hit.
I made Amanda’s heart cake once and my kids were thrilled. I’d make another cake just for them.
For my sister in law because she is always thinking of others and she deserves a treat!
I would love to make a surprise cake for Mother’s Day. My mom would love it!
Something purple in her favorite color would be lovely!
Not sure, I have a few people, my husband and a few friends.
Love it!!!
would love to make it for my office!!
My niece Chloe, because she is 4 and would get so excited over the inside.
I want to make surprise cakes for eveyone in our family! I love cake and what better reason to eat cake than to see the surprise insides!!!
I would definitely make a cake for my fiance! these are so awesome!!!
My daughter would love to have a surprise cake.
I would like to make a surprise cake for my son’s 18th birthday.
Annalise,
What a great giveaway! I want to make a bunny cake for my nieces – I’ll be seeing them on Easter.
Annamaria
I would make a surprise inside for my friends at school because what university student doesn’t want some free cake??
I would make one for my mom who just got diagnosed with breast cancer, she would adore it!
I’d make one for my little sister, because it is almost her birthday and she deserves a yummy cake for being such a good sis!
For my nephew who is coming home the end of May.
What a cute cake! I would love to make one for Easter and surprise my little nephew. This book would be a great one to add to my collection.
I would love to make one with a heart for my husband; he loves things like this.
oh yum looks delicious! I tried making a heart inside a cake the other day and it completely failed 😛 I am definitely going to try again though!
It would be great to make a cake to announce the gender of an upcoming baby.
I want to make one for my family, because I know it would make them smile.
I’d like to make one for my best friend who turns 50 this year.
omg! it’s amazing !
now beacause of you i’m still thinking about my next cake! :))
I would make a surprise cake for my son!
I would make a surprise cake for my son!
I’d like to make the rainbow heart cake for one of my favorite couples!
I would make this for my cute nephew for Easter!
Your cake is absolutely adorable!!!
My grandmother would love this sweet cake, so I’d love to surprise her with this cake!
Omg girl! This is *the cutest ever! My niece ————> going to go nuts over this!
you did it!!! It looks perfect
for my mom , because i was can’t bought a cake for her in a mom’s day 🙁
I would like to make it for a co-worker of mine. She’s been having a rough month and I would like to do something really sweet to make her smile! Plus she loves cake. 🙂
I would love to make this cake, it is so cute and perfect for Easter! But please help, I weigh all my ingredients and the recipe is missing the grams of the cake flour and the powdered sugar. Thank you!
My apologies! The measurements have now been added.
My husband because he loves a good cake!
I would make one for my family to celebrate being cancer free! 🙂 pink ribbon or pink heart in the center 😉
I would make one for my mom because she would LOVE the hidden surprise 🙂
I’d love to make a cake for my nephews first birthday!
For my sweet kids!! Thanks for the fun idea!
I would love to make a surprise inside cake for my niece. I would just love the look on her face when she saw something inside the cake. So fun! 🙂
I’d love to make a surprise inside cake for my baby sister. She’d be over the moon!
What a FUN surprise for the Grandkids!!
Would love to make one for the family Easter dinner
My son loves gummy worms. I think he’d love finding that inside a cake!
I would like to make one for my youngest son because of the look he’d have on his face! A baseball would be awesome. I love to bake cakes and this would help take it to the next level.
I would make a suprise for my daughter, her birthday is coming up soon
My husband because a) he’s a sugar addict and b) because I’m sure he’s never seen anything like it before!
I would love to make a surprise cake for my kids, as I think they would love it! Thanks for the giveaway!
A little cake just 4 me!^-^
Love ur recipies but is there any way a book can be purchased with the “surprise inside cake” book. I am 77 yrs & just now getting time 4 my crafts & cooking. I just now have a fancy iphone driving me crazy. So i will be watching u closely. Thanks 4 the time & efforts u put into this sight. I will enjoy it.