

How to Make Homemade Caramel Apples
Caramel apples are such a fun and delicious treat to make at home! Learn how to make homemade caramel apples with my step-by-step photo tutorial and best tips for success.

If you’ve only made caramel apples by melting down a bag of individual wrapped caramels, then this post is for you. Caramel apples made with homemade caramel candy are a million times better, and they’re actually quite easy. I’m sharing everything you need to know— from detailed instructions, lots of tips, and even some FAQs.
I love to make caramel apples with family and friends in the fall, as it’s such a classic combination of sweet and salty flavors, and everyone always has so much fun. Homemade caramel apples also make great gifts (we gave them away at our fall wedding many years ago!).

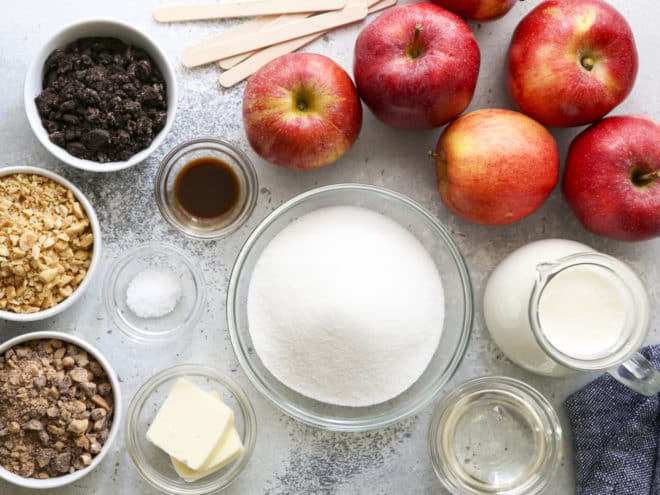
Ingredients you’ll need
- Apples: Any variety will work, but I like to use firm tart apples like Granny Smith, Pink Lady, and Gala.
- Heavy cream, granulated sugar and butter: The base for the homemade caramel sauce.
- Light corn syrup: Prevents the sugars from crystallizing and turning grainy, keeping the caramel smooth.
- Vanilla extract and salt: For flavor.
- Toppings as desired: Keep reading, I have some suggestions below.
Tools you’ll need: craft sticks or wooden skewers, a candy thermometer, a heavy bottom saucepan, and wax paper or parchment paper.
How to make caramel apples, step-by-step
- Prep apples. Wash apples thoroughly, remove stems, and insert craft sticks into the tops. Keep nearby, along with a sheet of wax/parchment paper, and make sure all toppings are ready.

- Start caramel sauce. Add cream, sugar, light corn syrup, and butter to a heavy-bottom saucepan and melt over medium heat. Bring mixture to a boil, then insert a candy thermometer.
- Cook caramel to 248°F. Stir caramel occasionally over medium heat until it reaches hard ball stage, or 248°F. The mixture will go from pale to golden as it cooks, and stirring helps the caramel cook evenly. Do not let it burn, turn down heat if needed.
- Stir in remaining ingredients. Immediately remove caramel from heat and whisk in 1 tablespoon heavy cream, vanilla extract, and salt. Whisk until smooth.
- Dip apples into caramel. The caramel will start setting up immediately, so you have to work quickly! Dip apples into the caramel, rolling them around until completely covered.
- Add toppings. If adding toppings, quickly roll caramel apple in the toppings until covered.
- Let cool. Place caramel apples on wax or parchment paper to set up completely. Let sit for about 30-60 minutes, or transfer to the fridge if you’d like them to set up sooner.


Optional caramel apple toppings
Caramel apples are definitely tasty enough on their own, but adding toppings is even more fun and delicious! Here are a few ideas:
- Chopped nuts
- Chopped candy bars like Heath or Butterfinger
- Mini M&Ms
- Toasted coconut
- Crushed cookies like Oreos or Biscoff
- Sprinkles

Tips for making homemade caramel apples
- Plan ahead to work quickly! Candy making isn’t specifically hard, but you have to pay attention. Read this recipe completely and have all ingredients and supplies ready to go before starting. This way there are no surprises or slow-downs.
- Use wax-free (not shiny) apples, or scrub apples before dipping. This ensures the caramel will stick easily. Look for wax-free apples in the organic section or at a farm stand. If you have wax-covered apples, soak them in a sink filled with 4 inches of water, 1 tablespoon lemon juice and 1 tablespoon baking soda, and scrub clean with a fresh sponge.
- Yes, you really do need a candy thermometer! It’s the only way to ensure the caramel will set up properly, and it actually makes the process EASIER (no guessing!). Here’s the one I use (it’s programmable and beeps when you’ve reached the proper temperature).
- If you are planning to add toppings, use two people if you can. One person to cover the apples with caramel, and one to roll in toppings, making it easier to finish the apples before the caramel is too hard for dipping.
- If the caramel hardens before you’re done dipping, whisk it over low heat for a few minutes, adding a teaspoon or two of heavy cream to loosen it up if needed. The more cream you add, the softer the caramel will be so add it sparingly.
- Keep caramel warm in a slow cooker. You can store prepared caramel in a slow cooker preheated to the low setting (do not put it in a cold slow cooker) until you are ready to dip apples. This is perfect if you plan to make caramel apples as a party activity. Stir it occasionally to make sure it stays smooth.
- How to store caramel apples: The caramel apples are best the day they are made, but will keep at room temperature for several days.
FAQs
Most likely, no. Making caramel is basically chemistry at work and substitutions will not yield the same results. I have only tested the recipe as written.
If it’s too thin and immediately runs off the apple, the caramel likely was not cooked to the proper temperature of 248°F and hasn’t set up properly. However, if you have cooked the caramel properly and you still find it pools at the bottom of the apples, it could be that the caramel was too cool and thick. This causes too much to stick to your apples, and gravity will pull a lot off as it sets. See my tips above for keeping caramel soft and warm for dipping.
The caramel was overcooked past 248°F, and is now in the “soft-crack” or “hard-crack” stage. More about candy stages here.
The caramel was stirred too vigorously while it was cooking, incorporating air. Stir only as needed to prevent burning.
More caramel recipes
Fall in love with these other recipes using homemade caramel!
- How to Make Homemade Caramel Sauce
- Apple Cider Caramel Sauce
- Soft Caramel Popcorn
- Chocolate Covered Caramels
Get the recipe

Homemade Caramel Apples
Ingredients
- 1 cup + 1 tablespoon (240 grams) heavy cream
- 1 cup (200 grams) granulated sugar
- 2 tablespoons (28 grams) unsalted butter
- ¼ (78 grams) light corn syrup
- ½ teaspoon salt
- 1 teaspoon vanilla extract
- 6 small-medium apples , washed thoroughly
- 6 wooden skewers or craft sticks
Toppings (optional)
- Chopped nuts
- Chopped candy bars
- Crushed Oreos
- Mini M&Ms
- Toasted coconut
Equipment


Instructions
- Insert craft sticks into the tops of the apples and keep them nearby. Lay out a sheet of parchment/wax paper out. Have toppings (if using) ready to go.
- In a heavy bottomed saucepan, combine 1 cup of cream, sugar, butter and corn syrup over medium heat. Stir occasionally until melted and smooth and mixture begins to boil.
- Insert a candy thermometer and let mixture cook to 248°F or "firm-ball" stage, while continuing to stir occasionally. Mixture will caramelize and turn golden brown as it cooks. Watch it carefully to make sure it doesn't burn.
- As soon as it reaches 248°F, remove the pan from the heat and whisk in the 1 tablespoon cream, salt, and vanilla extract. Mixture will bubble violently at first. Stir until smooth.
- Working quickly, immediately begin dipping the apples, letting the excess caramel drip back into the pan. Roll the apples in the toppings, if using. Set the dipped apples on the parchment or wax paper and let sit for 30-60 minutes.
- The caramel apples will keep stored at room temperature for 2 days, but are best the day they are made.

Recipe was originally published October 2013.

Can I use light corn syrup
Yes, light corn syrup! I just clarified the recipe.
Delicious! I would love to see more of your recipes and tips, keep sharing!
it was amazing and too fascinating. I love your food. I will cook it for my family this weekend. This is truly a great and easy recipe. Thanks for sharing it!
Can these be wrapped in cellophane once set or are they too soft?
Also could I use food dye to change the colour? I want to make black caramel to cover green apples
Hi Kat! They are still a little soft, so they may still to the cellophane a bit. You could try lightly greasing the cellophane with nonstick spray. And about the food dye, I imagine it would be fine to add it, though I’ve never actually tried it myself so I can’t say for sure. Hope this helps!
I am doing caramel apples for a festival. And wondered if I could keep this caramel just on warm in a crockpot so the kids could make there own caramel apples. Would you have any ideas?
You know, I couldn’t say for sure since I haven’t tried it myself. But if you have a crock pot already warmed and ready to go and dumped the caramel straight in there from the pot exactly at the right temp, it just might work. Good luck! Let me know if you try it!
I love making caramel apples at home! I am IN LOVE with your photos!
I’ve been dabbling in caramel apple recipes lately. My biggest problem is that all of the caramel slips down the sides of the apples into a big puddle. I’ve washed the apples, scrubbed the apples, soaked them in a water/vinegar bath. Still the caramel puddles. What am I doing wrong?
And your apples look perfect-well done!
If the apples are truly wax-free and not to blame, then it sounds like you’re not cooking the caramel long enough in order for it to be hard enough to firm up before it has time to run down the sides. At least that’s my best guess.
Yummy! These look amazing! I am making these this weekend for sure!
So…..when I visit in December can you show me your caramel making ways? These are beautiful!
Yes! Let’s have a caramel party!
Caramel apples are seriously the most fun fall treats!! Beautiful photos, Annalise!
A classic fall treat! These look so delicious, and your photos are beautiful, Annalise! Lovely recipe.
of course your caramel apples look perfect 🙂 I’ll be trying your tips next time I make them. Mine always look strange but taste good!
So pretty! the best part about caramel apples that if you have left overs; they make for awesome apple caramel bread or cookies.
These are one of my all time favorite treats! Love this!
Oh my, caramel apples are one of my favorite fall-ish desserts! I fell in love with them the first time I watched the Disney movie: Mary Poppins! I’ve already tried to make them from scratch at home myself and even posted the recipe on my blog! I’ll try out your version, as well, as soon as I get a new box of juicy apples from the farmers’ market next Saturday 🙂
xo, Elisa